Velocity原理探究
一、前言
常见的Java模板引擎有JSP、Freemark,Velocity。在MVC三层框架中,模板引擎属于view层,实质是把model层内容展现到前台页面的一个引擎,velocity以其前后端解耦使前后台可以同时开发和其语法的简易性得到了广泛的应用,集团WebX框架就建议使用它作为模板引擎。
二、原理
2.1 架构介绍
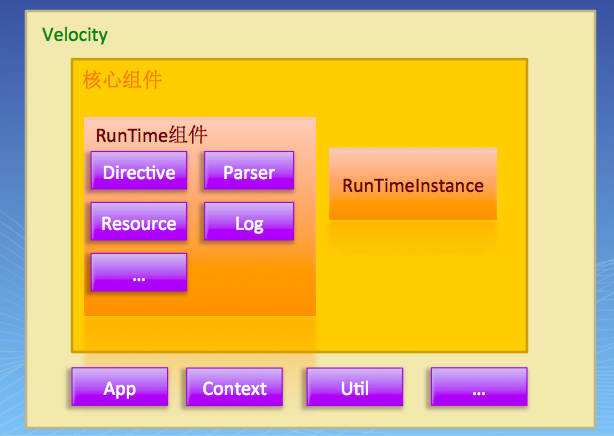
打开velocity的源码包,从代码结构看velocity主要包括app、context、runtime、event、texen和一些util类
1)、app模块
源码org.apache.velocity.app下面主要有两个类Velocity和VelocityEngine。
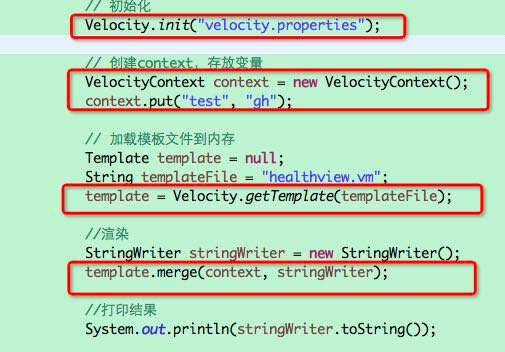
- Velocity ,主要对外提供一些static方法,可以通过类名直接调用,只要通过Velocity创建一个模块,在创建一个存放变量的context,就可以渲染,如下:
另外Velocity功能是委托给RuntimeInstance来具体实现的,并且维护的是一个单件实例,就是说在同一个jvm中,只有一个Velocity的实例,这给资源共享和配置本地化带来的方便,这为在通一个JVM的不同应用见共享模块提供了方便。
- VelocityEngine ,相比于Velocity提供了更加强大的功能,框架开发者一般使用这个类在框架中使用velocity模板渲染功能,内部也是是委托给RuntimeInstance来具体实现的,但是每个VelocityEngine都有一个自己的RuntimeInstance实例。也就是说在一个JVM中可以有多个VelocityEngine实例,每个实例都可以定制化自己的配置,这为在同一个应用中配置不同的模板路径和logger提供了方便。
例如springmvc中初始化一个veloctiy引擎方式如下:

2)、Context模块
源码org.apache.velocity.context包下的Context,AbstractContext,还有org.apache.velocity下的VelocityContext。主要功能是提供对模板渲染所需要的变量的封装管理.
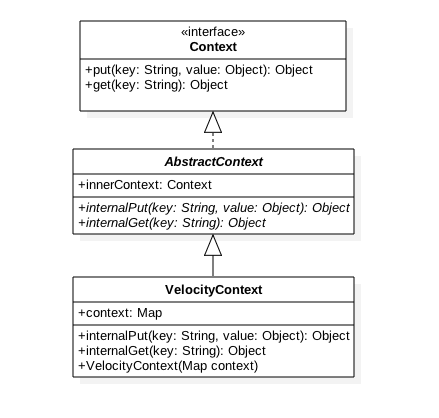
Context设计目的:
- 作为一个适配器,便于与其他框架集成
例如SpringMVC传递参数的是一个Map的数据结构,那么如果springmvc中使用velocity则需要把map里面存放的变量适配到context中,这个是直接把map作为VelocityContext构造函数参数适配的。但是webx使用的是自己的context,PullableMappedContext存放变量,那么就需要继承velocity的AbstractContext实现一个适配器TemplateContextAdapter来把自己的context转换为velocity所需要的context. - Velocity内部数据隔离,Velocity不同模块通过传递参数方式进行处理,利于模块之间的解耦。
3)、RunTime模块
源码org.apache.velocity.runtime包下:
负责加载模板文件,解析为JavaCC语法树,使用深度遍历算法渲染语法书节点,生成渲染结果。
4)、RuntimeInstance
负责解析模板文件为AST结构,velocity和velocityengine内部都是委托给它来实现功能。
5)、util模块
一些工具类,例如SimplePool是一个对象池,里面默认缓存20个Parser。CalssUtiles是一个简单的从classloader操作类和资源的函数类。
2.2 源码分析
2.2.1 试验准备
pom中添加velocity依赖
<dependency>
  <groupId>velocity-tools</groupId>
  <artifactId>velocity-tools-generic</artifactId>
  <version>1.4</version>
</dependency>
测试java代码:
public static void main(String[] args) {

try {
    // 初始化(1)
    Velocity.init("velocity.properties");

    // 创建context,存放变量(2)
    VelocityContext context = new VelocityContext();
    Person person = new Person();
    person.setName("jiaduo");
    context.put("person", person);

    // 加载模板文件到内存(3)
    Template template = null;
    String templateFile = "healthview.vm";
    template = Velocity.getTemplate(templateFile);

    // 渲染(4)
    StringWriter stringWriter = new StringWriter();
    template.merge(context, stringWriter);

    // 打印结果
    System.out.println(stringWriter.toString());

} catch (Exception e) {
    e.printStackTrace();
}
}
healthview.vm内容:
<html>
</html>
velocity.properties内容:
file.resource.loader.path = /Users/zhuizhumengxiang/workspace/mytool/SpringLean/src/
2.2.2 源码分析
先看下(1)Velocity.init()时序图: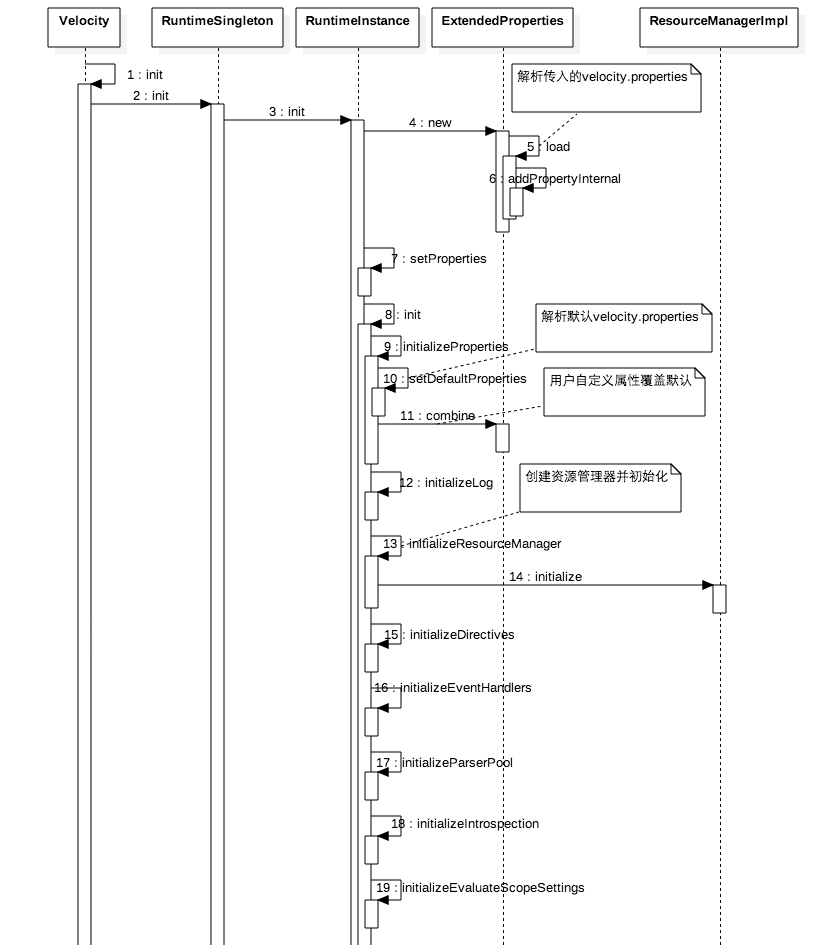
从时序图可知Velocity是委托给RuntimeInstance去实现初始化工作,RuntimeSingleton则是保证RuntimeInstance的单例。init里面首先解析用户传递的配置文件,然后解析: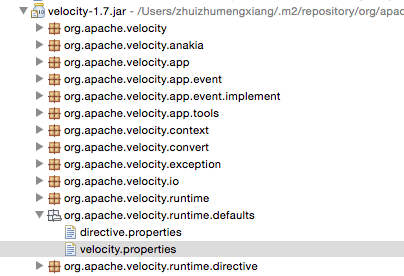
最后使用用户配置文件配置项覆盖默认配置项。
public synchronized void init()
    {
        if (!initialized && !initializing)
        {
            log.debug("Initializing Velocity, Calling init()...");
            initializing = true;

            log.trace("*******************************************************************");
            log.debug("Starting Apache Velocity v1.7 (compiled: 2010-11-19 12:14:37)");
            log.trace("RuntimeInstance initializing.");

            initializeProperties();//配置文件解析
            initializeLog();//初始化日志
            initializeResourceManager();//初始化资源管理器和资源加载器
            initializeDirectives();//初始化Directives
            initializeEventHandlers();// 初始化事件处理器
            initializeParserPool();//初始化解析器 对象池

            initializeIntrospection();// 初始化自省
            initializeEvaluateScopeSettings();
            /*
             *  initialize the VM Factory.  It will use the properties
             * accessable from Runtime, so keep this here at the end.
             */
            vmFactory.initVelocimacro();

            log.trace("RuntimeInstance successfully initialized.");

            initialized = true;
            initializing = false;
        }
    }
initializeResourceManager的代码逻辑:
 private void initializeResourceManager()
    {
        /*
         * org.apache.velocity.runtime.resource.ResourceManagerImpl
         */
        String rm = getString(RuntimeConstants.RESOURCE_MANAGER_CLASS);

        if (rm != null && rm.length() > 0)
        {

            Object o = null;
            //创建资源管理器实例
            try
            {
               o = ClassUtils.getNewInstance( rm );
            }
            ...

            resourceManager = (ResourceManager) o;
            //初始化资源管理器
            resourceManager.initialize(this);
         }
        ...
 }

//初始化资源管理器
public synchronized void initialize(final RuntimeServices rsvc)
{   ...
    ResourceLoader resourceLoader = null;

    this.rsvc = rsvc;
    log = rsvc.getLog();

    log.trace("Default ResourceManager initializing. (" + this.getClass() + ")");

    assembleResourceLoaderInitializers();

    //创建资源加载器
    for (Iterator it = sourceInitializerList.iterator(); it.hasNext();)
    {
        /**
         * Resource loader can be loaded either via class name or be passed
         * in as an instance.
         */
        ExtendedProperties configuration = (ExtendedProperties) it.next();

        String loaderClass = StringUtils.nullTrim(configuration.getString("class"));
        ResourceLoader loaderInstance = (ResourceLoader) configuration.get("instance");

        if (loaderInstance != null)
        {
            resourceLoader = loaderInstance;
        }
        else if (loaderClass != null)
        {
            resourceLoader = ResourceLoaderFactory.getLoader(rsvc, loaderClass);
        }
        ...
        resourceLoader.commonInit(rsvc, configuration);
        resourceLoader.init(configuration);
        resourceLoaders.add(resourceLoader);
    }


    //org.apache.velocity.runtime.resource.ResourceCacheImpl
    String cacheClassName = rsvc.getString(RuntimeConstants.RESOURCE_MANAGER_CACHE_CLASS);

    Object cacheObject = null;
    //创建缓存实例
    if (org.apache.commons.lang.StringUtils.isNotEmpty(cacheClassName))
    {
        try
        {
            cacheObject = ClassUtils.getNewInstance(cacheClassName);
        }
        ...
    }

    /*
     *  if we didn't get through that, just use the default.
     */
    if (cacheObject == null)
    {
        cacheObject = new ResourceCacheImpl();
    }

    globalCache = (ResourceCache) cacheObject;
    //初始化缓存
    globalCache.initialize(rsvc);

}

 //初始化缓存
 public void initialize( RuntimeServices rs )
{
    rsvc = rs;
    //默认配置文件里没这个变量,所以默认最多缓存89个模板文件
    int maxSize =
        rsvc.getInt(RuntimeConstants.RESOURCE_MANAGER_DEFAULTCACHE_SIZE, 89);
    if (maxSize > 0)
    {
        // Create a whole new Map here to avoid hanging on to a
        // handle to the unsynch'd LRUMap for our lifetime.
        Map lruCache = Collections.synchronizedMap(new LRUMap(maxSize));
        lruCache.putAll(cache);
        cache = lruCache;
    }
    rsvc.getLog().debug("ResourceCache: initialized ("+this.getClass()+") with "+
           cache.getClass()+" cache map.");
}
initializeParserPool逻辑,目的应该是为了提高性能:
 private void initializeParserPool()
    {
        /*
         * 配置中获取,org.apache.velocity.runtime.ParserPoolImpl
         */
        String pp = getString(RuntimeConstants.PARSER_POOL_CLASS);

        if (pp != null && pp.length() > 0)
        {

            Object o = null;

            try
            {//实例化
                o = ClassUtils.getNewInstance( pp );
            }
            ...

            parserPool = (ParserPool) o;
           //调用初始化方法,创建parser对象池
            parserPool.initialize(this);
        }
        ...

}
//创建Parser对象池
 public void initialize(RuntimeServices rsvc)
    {   //默认为20个
        max = rsvc.getInt(RuntimeConstants.PARSER_POOL_SIZE, RuntimeConstants.NUMBER_OF_PARSERS);
        pool = new SimplePool(max);

        for (int i = 0; i < max; i++)
        {
            pool.put(rsvc.createNewParser());
        }

        if (rsvc.getLog().isDebugEnabled())
        {
            rsvc.getLog().debug("Created '" + max + "' parsers.");
        }
}
initializeIntrospection的逻辑:
 private void initializeIntrospection()
    {//[org.apache.velocity.util.introspection.UberspectImpl]
        String[] uberspectors = configuration.getStringArray(RuntimeConstants.UBERSPECT_CLASSNAME);
        for (int i=0; i <uberspectors.length;i++)
        {
            String rm = uberspectors[i];
            Object o = null;

            try
            {
               o = ClassUtils.getNewInstance( rm );
            }
            。。。

            Uberspect u = (Uberspect)o;


            {
                if (u instanceof ChainableUberspector)
                {
                    ((ChainableUberspector)u).wrap(uberSpect);
                    uberSpect = u;
                }
                else
                {
                    uberSpect = new LinkingUberspector(uberSpect,u);
                }
            }
        }

        if(uberSpect != null)
        {
            uberSpect.init();
        }
       ...
    }

    public void init()
    {
        introspector = new Introspector(log);
    }
在看下(2)代码如下:
public Object put(String key, Object value)
    {

        if (key == null)
        {
            return null;
        }

        return internalPut(key.intern(), value);
    }

    public Object internalPut( String key, Object value )
    {  //context是一个HashMap
        return context.put( key, value );
    }
在看下(3)时序图
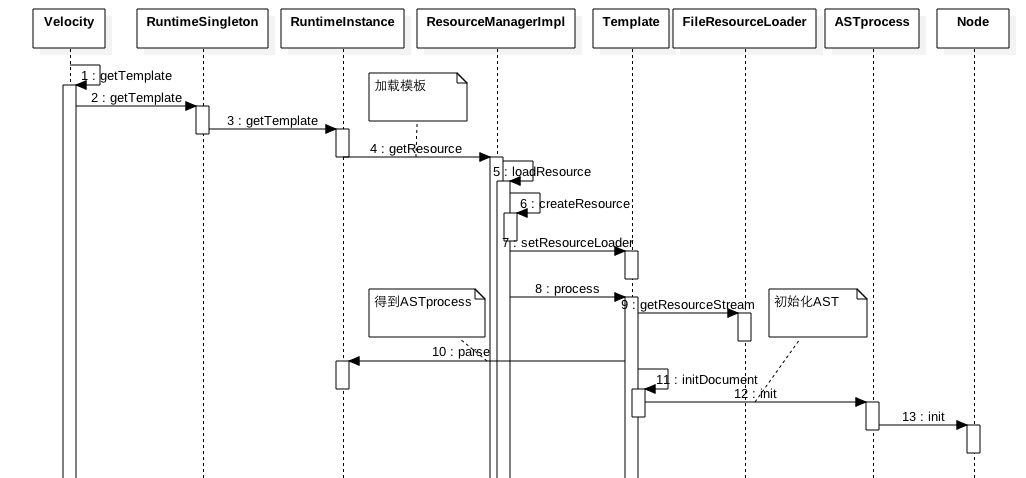
从时序图知道首先去加载模板文件到内存,代码如下:
 public Resource getResource(final String resourceName, final int resourceType, final String encoding)
        throws ResourceNotFoundException,
            ParseErrorException
    {

        //先从缓存里面查找
        String resourceKey = resourceType + resourceName;
        Resource resource = globalCache.get(resourceKey);

        if (resource != null)
        {
            try
            {
                // 缓存命中,则看是否开定时从磁盘加载,定时到了则从磁盘加载
                if (resource.requiresChecking())
                {
                    //从磁盘加载
                    resource = refreshResource(resource, encoding);
                }
            }
            ...
        }
        else
        {
            try
            {
                //从磁盘加载
                resource = loadResource(resourceName, resourceType, encoding);

                //开启了缓存,则放入缓存
                if (resource.getResourceLoader().isCachingOn())
                {
                    globalCache.put(resourceKey, resource);
                }
            }
           ...
        }

        //返回资源
        return resource;
    }
file.resource.loader.cache = false
file.resource.loader.modificationCheckInterval = 2
默认不开启缓存,CheckInterval = 2。
然后解析模板文件为ast结构
loadResource->()
{
    resource.process()
    {
        RuntimeInstance.parse();//解析模板文件为AST node结构
    }
}

public SimpleNode parse(Reader reader, String templateName, boolean dumpNamespace)
        throws ParseException
    {
        requireInitialization();

        Parser parser = (Parser) parserPool.get();
        boolean keepParser = true;
        if (parser == null)
        {
            //没有可用的则创建
            if (log.isInfoEnabled())
            {
                log.info("Runtime : ran out of parsers. Creating a new one. "
                      + " Please increment the parser.pool.size property."
                      + " The current value is too small.");
            }
            parser = createNewParser();
            keepParser = false;
        }

        try
        {
            ...
            return parser.parse(reader, templateName);
        }
        finally
        {
            //如果从对象池获取则使用后归还
            if (keepParser)
            {
                parserPool.put(parser);
            }

        }
    }
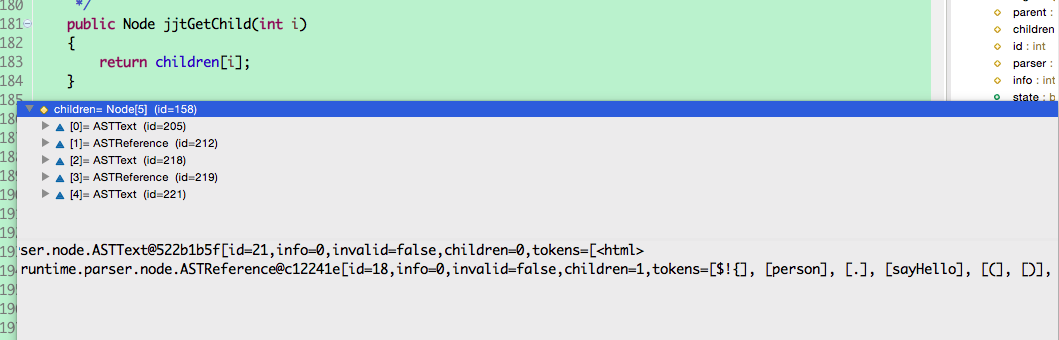
目前template里面的data对应内容:

再看下(4)时序图为:

如图debug可知velocity把healthview.vm解析为了5段:
画出ast树图如下:
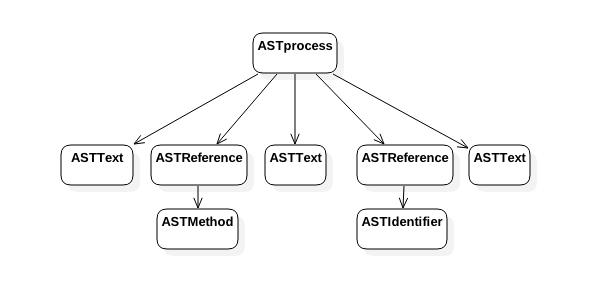
其中从左向右第一个节点是vm中 <html>
解析为ASTText文本节点内容为:[
第二个节点是对$!{person.sayHello()}的解析,是一个ASTReference节点,该节点有一个子节点ASTmethod,
第三个节点是对vm中:解析为ASTText文本节点内容为:[ :]
第四个节点是对vm中$!{person.name}的解析,是是一个ASTReference节点,该节点子节点是ASTIdentifier
第五个节点是VM中</html>的解析,解析为ASTText文本节点内容为:[</div></html>]]
ASTProcess的render方法是采用树的深度遍历算法来渲染节点的,具体代码:
   public boolean render( InternalContextAdapter context, Writer writer)
        throws IOException, MethodInvocationException, ParseErrorException, ResourceNotFoundException
    {
        int i, k = jjtGetNumChildren();

        for (i = 0; i < k; i++)
            jjtGetChild(i).render(context, writer);

        return true;
    }
不同类型子节点渲染方法不一样,下面看下ASTText类型,可知只是简单的把文本写入writer:
    public boolean render( InternalContextAdapter context, Writer writer)
        throws IOException
    {
        writer.write(ctext);
        return true;
    }
再看下有子节点ASTmethod的ASTReference的渲染:
ASTReference.render()
 public boolean render(InternalContextAdapter context, Writer writer) throws IOException,
            MethodInvocationException
    {
        ...
        {
          //执行execute方法
          value = execute(null, context);
        }

        String localNullString = null;
        ...
        value = EventHandlerUtil.referenceInsert(rsvc, context, literal, value);

        String toString = null;
        if (value != null)
        {
            if (value instanceof Renderable)
            {
                Renderable renderable = (Renderable)value;
                try
                {
                    if (renderable.render(context,writer))
                      return true;
                }
                catch(RuntimeException e)
                {
                    // We commonly get here when an error occurs within a block reference.
                    // We want to log where the reference is at so that a developer can easily
                    // know where the offending call is located.  This can be seen
                    // as another element of the error stack we report to log.
                    log.error("Exception rendering "
                        + ((renderable instanceof Reference)? "block ":"Renderable ")
                        + rootString + " at " + Log.formatFileString(this));
                    throw e;
                }
            }

            toString = value.toString();
        }
        ...
        {
            //person.sayHello()结果写入writer
            writer.write(escPrefix);
            writer.write(morePrefix);
            writer.write(toString);

            return true;
        }
    }
 ASTReference.execute
 public Object execute(Object o, InternalContextAdapter context)
        throws MethodInvocationException
    {

        ...
        //获取person对象
        Object result = getVariableValue(context, rootString);

        try
        {
            Object previousResult = result;
            int failedChild = -1;
            for (int i = 0; i < numChildren; i++)
            {
                ...
                previousResult = result;
                //递归解析,调用AstMethod.execute()反射调用person.sayHello();
                result = jjtGetChild(i).execute(result,context);
                if (result == null && !strictRef)  // If strict and null then well catch this
                                                   // next time through the loop
                {
                    failedChild = i;
                    break;
                }
            }

            ...


            return result;
        }
        catch(MethodInvocationException mie)
        {
            mie.setReferenceName(rootString);
            throw mie;
        }
    }
“`Java ASTmethod.execute
public Object execute(Object o, InternalContextAdapter context)
throws MethodInvocationException
{
    Object [] params = new Object[paramCount];


    final Class[] paramClasses =
        paramCount > 0 ? new Class[paramCount] : ArrayUtils.EMPTY_CLASS_ARRAY;

    for (int j = 0; j < paramCount; j++)
    {
        params[j] = jjtGetChild(j + 1).value(context);
        if (params[j] != null)
        {
            paramClasses[j] = params[j].getClass();
        }
    }

    VelMethod method = ClassUtils.getMethod(methodName, params, paramClasses,
        o, context, this, strictRef);
    if (method == null) return null;

    try
    {
        //反射调用person.sayHello()
        Object obj = method.invoke(o, params);

        if (obj == null)
        {
            if( method.getReturnType() == Void.TYPE)
            {
                return "";
            }
        }

        return obj;
    }
    ....
}
同理看下ASTIdentifier.execute
```java
 public Object execute(Object o, InternalContextAdapter context)
        throws MethodInvocationException
    {

        VelPropertyGet vg = null;

        try
        {
            /*
             *  first, 是否在缓存里面.
             */

            IntrospectionCacheData icd = context.icacheGet(this);
            if ( icd != null && (o != null) && (icd.contextData == o.getClass()) )
            {
                vg = (VelPropertyGet) icd.thingy;
            }
            else
            {
                //自省获取,默认开启缓存
                vg = rsvc.getUberspect().getPropertyGet(o,identifier, uberInfo);
                if (vg != null && vg.isCacheable() && (o != null))
                {
                    icd = new IntrospectionCacheData();
                    icd.contextData = o.getClass();
                    icd.thingy = vg;
                    context.icachePut(this,icd);
                }
            }
        }
        ...

        try
        {   //反射调用get方法
            return vg.invoke(o);
        }
        。。。
    }
另外ASTIdentifier.execute中的 rsvc.getUberspect().getPropertyGet(o,identifier, uberInfo);的逻辑有必要单独说下: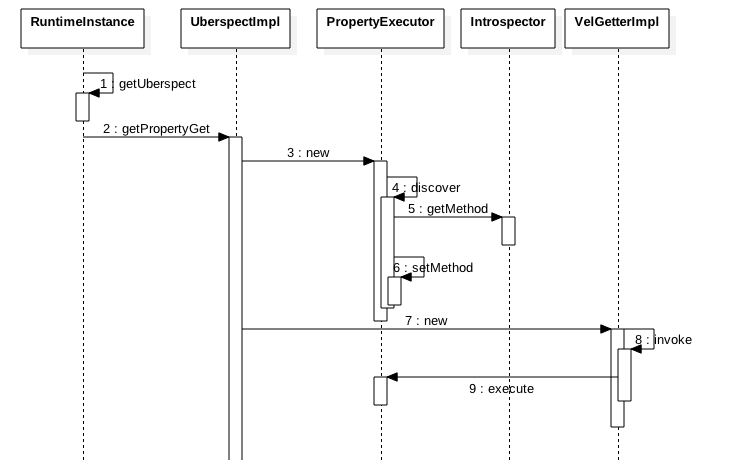
总结:velocity渲染引擎首先磁盘加载模板文件到内存,然后解析模板模板文件为AST结构,并对AST中每个节点进行初始化,第二次加载同一个模板文件时候如果开启了缓存则直接返回模板资源,通过使用资源缓存节省了从磁盘加载并重新解析为AST的开销。
然后配合context里面的变量值深度变量渲染AST节点到writer,对应TExt节点直接写入writer,对应引用节点则先从context获取对象实例,然后通过反射调用指定的方法,调用方法时候没有缓存,每调用一次就反射一次,但是使用对象.属性名方式第一次要使用自省功能找到getMethod,然后在反射调用,但是第二次调用同一个属性时候由于使用了缓存就省去了自省的过程,但是反射还是要的。所以在编写velocity模板时候尽可能使用临时变量保存反射调用结果,减少反射调用次数,降低页面渲染时间。
另外如果开启了资源缓存,并且file.resource.loader.modificationCheckInterval >0还会实现hot deploy也就是会每隔一段时间从磁盘获取最新的模板,重新生成AST结构,即使使用了缓存。
三、webx中veloctiy的使用
3.1 webx集成veloctiy配置入口
在webx的webx-component.xml里面有一个配置如下:
<services:template
        xmlns="http://www.alibaba.com/schema/services/template/engines"
        searchExtensions="true">
        <velocity-engine templateEncoding="UTF-8"
            strictReference="false" path="/${component}/templates">
            <plugins>
                <vm-plugins:escape-support defaultEscape="html">
                    <vm-plugins:noescape>
                        <vm-plugins:if-matches pattern="^control\." />
                        <vm-plugins:if-matches pattern="^screen_placeholder" />
                        <vm-plugins:if-matches pattern="^stringEscapeUtil\.escape" />
                        <vm-plugins:if-matches pattern="^csrfToken\.(get)?(\w*)hiddenField" />
                    </vm-plugins:noescape>
                </vm-plugins:escape-support>
            </plugins>
        </velocity-engine>
        <freemarker-engine templateEncoding="UTF-8"
            path="/${component}/templates" />
        <jsp-engine path="/${component}/templates" />
    </services:template>
而解析该配置的解析器为:TemplateServiceDefinitionParser
首先说下,该配置目的是创建一个beanname=templateService的TemplateServiceImpl类,并实例化三种渲染引擎。下面看下解析代码:
public class TemplateServiceDefinitionParser extends AbstractNamedBeanDefinitionParser<TemplateServiceImpl> implements
                                                                                                            ContributionAware {
    private ConfigurationPoint templateEnginesConfigurationPoint;

    //(1) 解析插件等配置
    public void setContribution(Contribution contrib) {
        this.templateEnginesConfigurationPoint = getSiblingConfigurationPoint("services/template/engines", contrib);
    }

    @Override
    protected void doParse(Element element, ParserContext parserContext, BeanDefinitionBuilder builder) {
        parseBeanDefinitionAttributes(element, parserContext, builder);

        Map<Object, Object> engines = createManagedMap(element, parserContext);
        Map<Object, Object> mappings = createManagedMap(element, parserContext);

        ElementSelector engineSelector = ns(templateEnginesConfigurationPoint.getNamespaceUri());
        ElementSelector mappingSelector = and(sameNs(element), name("template-mapping"));

        for (Element subElement : subElements(element)) {
            //(2) engine,解析并创建三个渲染引擎的bean定义
            if (engineSelector.accept(subElement)) {
                BeanDefinitionHolder engine = parseConfigurationPointBean(subElement,
                                                                          templateEnginesConfigurationPoint, parserContext, builder);
                engines.put(engine.getBeanName(), engine);
            }

            // mapping
            else if (mappingSelector.accept(subElement)) {
                String ext = normalizeExtension(subElement.getAttribute("extension"));
                String engineName = assertNotNull(trimToNull(subElement.getAttribute("engine")), "engine");

                assertNotNull(ext, "extension");
                assertTrue(!mappings.containsKey(ext), "duplicated extension: %s", ext);

                mappings.put(ext, engineName);
            }
        }

        //设置TemplateServiceImpl的engines和engineNameMappings属性
        builder.addPropertyValue("engines", engines);
        builder.addPropertyValue("engineNameMappings", mappings);

        attributesToProperties(element, builder, "defaultExtension", "searchExtensions", "searchLocalizedTemplates",
                               "cacheEnabled");
    }

    @Override
    protected String getDefaultName() {
        return "templateService";
    }
}
其中(2)创建了velocity的渲染引擎实例VelocityEngineImpl,解析器为VelocityEngineDefinitionParser为:
protected void doParse(Element element, ParserContext parserContext, BeanDefinitionBuilder builder) {
    attributesToProperties(element, "configuration.", builder, "path", "cacheEnabled", "modificationCheckInterval",
                           "strictReference", "templateEncoding");

    ElementSelector globalMacros = and(sameNs(element), name("global-macros"));
    ElementSelector plugins = and(sameNs(element), name("plugins"));
    ElementSelector advancedProperties = and(sameNs(element), name("advanced-properties"));

    for (Element subElement : subElements(element)) {
        if (globalMacros.accept(subElement)) {
            //设置VelocityEngineImpl的成员变量configuration的属性值macros
            parseGlobalMacros(subElement, parserContext, builder);
        } else if (plugins.accept(subElement)) {
            //设置VelocityEngineImpl的成员变量configuration的属性值properties
            parsePlugins(subElement, parserContext, builder);
        } else if (advancedProperties.accept(subElement)) {
            parseAdvancedProperties(subElement, parserContext, builder);
        }
    }
}
3.2 velocity初始化
上节讲了集成velocity需要的一些bean的定义,下面看下如何实例并初始化: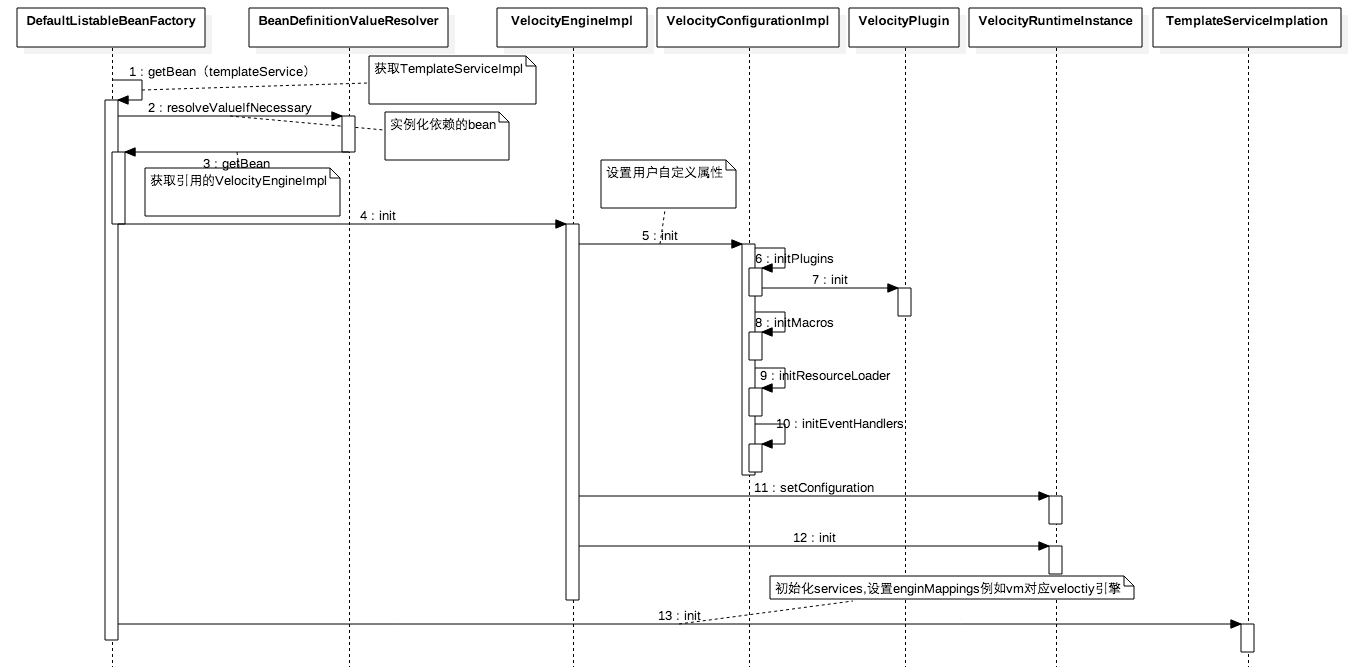
SpringIOC首先创建TemplateServiceImpl对象,但是要首先创建成员变量engines里面的VelocityEngineImpl,所以首先创建了它,然后调用init初始化,初始化过程首先获取webx-compoment.xml里面配置的插件等用户自定义属性,然后初始化默认的velocity.properties,然后用户属性覆盖默认属性,这也说明webx框架还是留有口子,让用户自定义veloctiy行为。然后回到
TemplateServiceImpl的创建,调用init方法设置映射,也就是后缀名与模板引擎的映射如下:
    ftl=com.alibaba.citrus.service.freemarker.impl.FreeMarkerEngineImpl#684bd25b:FreeMarkerEngine, jsp=JspEngine[/common/templates/],
jspx=JspEngine[/common/templates/], vm=com.alibaba.citrus.service.velocity.impl.VelocityEngineImpl#5c6c2c1c:VelocityEngine

}
webx是基于模块的,并且所有模块都import了webx-component.xml ,所以每个模块都有自己的veloctiyengine,例如我的webx例子里面有auth,comm,business,rock模块,所以如下创建了四个引擎对象,对应不同的模板文件路径:
{com.alibaba.citrus.service.velocity.impl.VelocityEngineImpl#3fdeabbc=com.alibaba.citrus.service.velocity.impl.VelocityEngineImpl#3fdeabbc:VelocityEngine, [/rock/templates/]}

{com.alibaba.citrus.service.velocity.impl.VelocityEngineImpl#5783395d=com.alibaba.citrus.service.velocity.impl.VelocityEngineImpl#5783395d:VelocityEngine, [/comm/templates/]}

{com.alibaba.citrus.service.velocity.impl.VelocityEngineImpl#2d4f8a40=com.alibaba.citrus.service.velocity.impl.VelocityEngineImpl#2d4f8a40:VelocityEngine, [/business/templates/]}

{com.alibaba.citrus.service.velocity.impl.VelocityEngineImpl#2ee2af0=com.alibaba.citrus.service.velocity.impl.VelocityEngineImpl#2ee2af0:VelocityEngine, [/auth/templates/]}
3.3一次渲染过程

首先通过pipeline里面的PerformScreenValve调用screen对应的Java类设置变量,然后invoke RenderTemplateValve委托给veloctiy引擎VelocityEngineImpl执行模板获取与渲染。
四、SpringMVC中veloctiy的使用
4.1 SpringMVC集成veloctiy配置入口
在DispatcherServlet的配置文件里面添加如下:
    <!--1、对模型视图名称的解析,即在模型视图名称添加前后缀 -->
    <bean id="viewResolver"
        class="org.springframework.web.servlet.view.velocity.VelocityLayoutViewResolver">
        <property name="allowSessionOverride" value="true" />
        <property name="exposeSessionAttributes" value="true" />
        <property name="cache" value="true" />
        <property name="prefix" value="" />
        <property name="layoutUrl" value="layout.vm" />
        <property name="suffix" value=".vm" />
        <property name="contentType">
            <value>text/html;charset=UTF-8</value>
        </property>
    </bean>

    <!--2、velocity的一些设置 -->
    <bean id="velocityConfig"
        class="org.springframework.web.servlet.view.velocity.VelocityConfigurer">
        <property name="resourceLoaderPath">
            <value>/WEB-INF/templates/</value>
        </property>
        <property name="velocityProperties">
            <props>
                <prop key="input.encoding">UTF-8</prop>
                <prop key="output.encoding">UTF-8</prop>
                <prop key="contentType">text/html;charset=UTF-8</prop>

            </props>
        </property>
    </bean>
4.2 veloctiy初始化
先上一个时序图: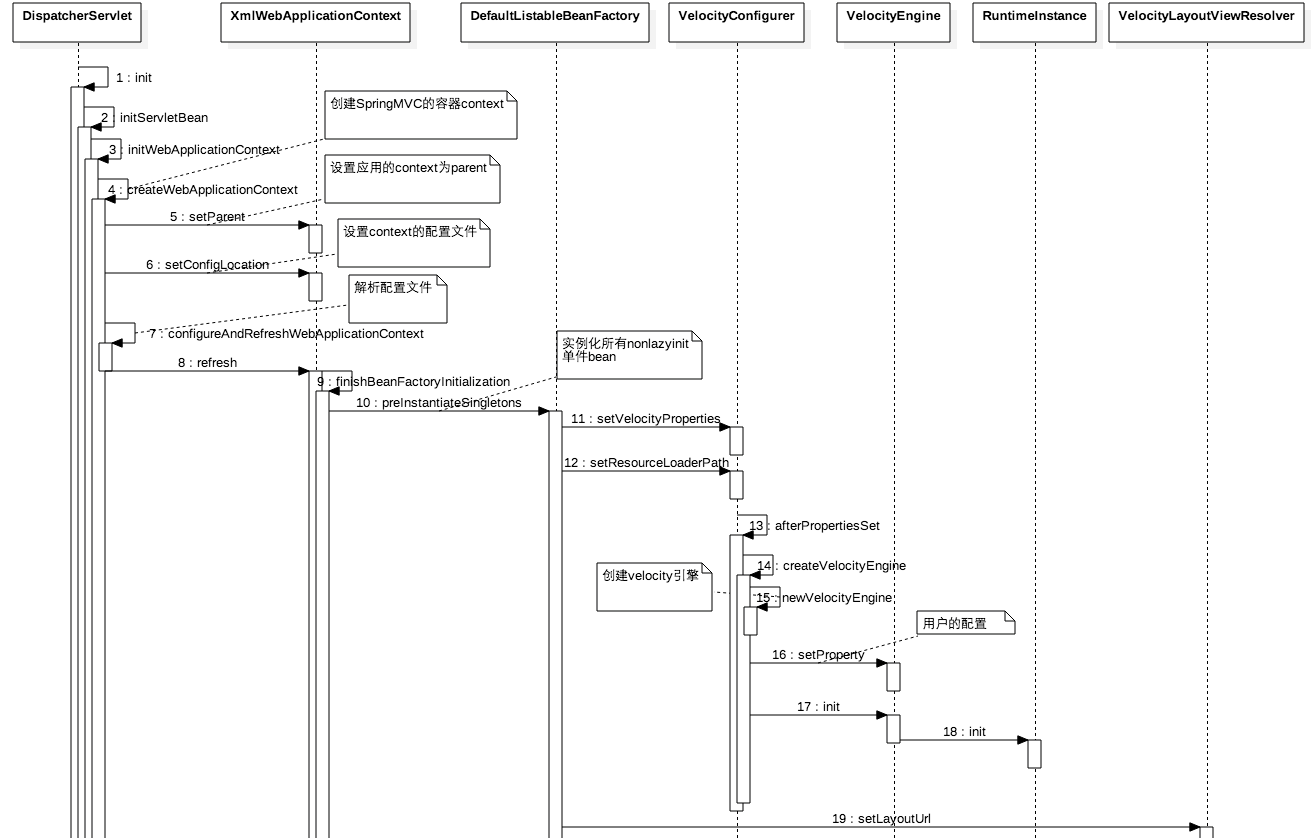
如图DispatcherServlet的init方法中创建了一个spring的context,去解析springDispatcher-servlet.xml里面配置的bean,首先实例并初始化了VelocityLayoutViewResolver,然后实例初始化了VelocityConfigurer,在它的afterPropertiesSet方法创建了veloctiy引擎并初始化。
4.3 一次渲染过程
先看下时序图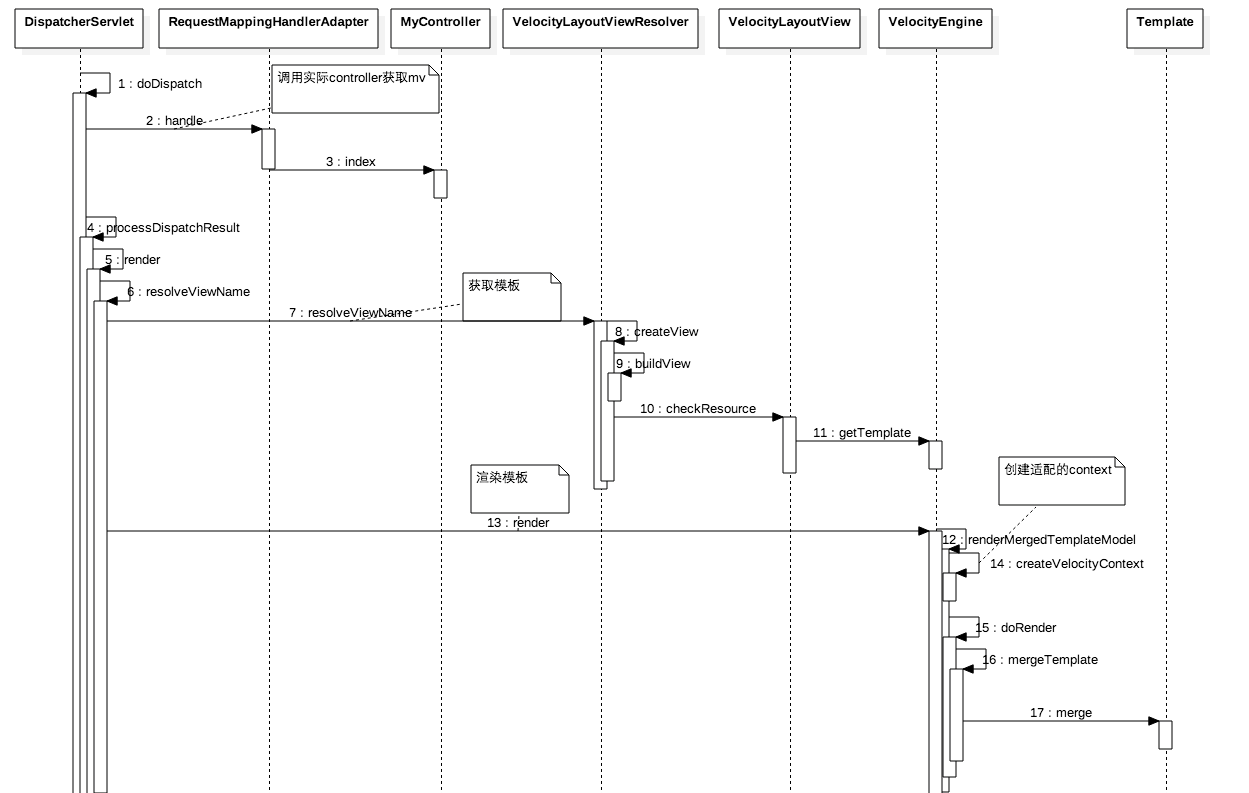
首先找到对应的controller返回包含参数的mv, 然后通过VelocityLayoutViewResolver去创建view:
public View resolveViewName(String viewName, Locale locale) throws Exception {
        //是否开启缓存,没开启则创建
        if (!isCache()) {
            return createView(viewName, locale);
        }
        else {
            //开启缓存,首先看缓存
            Object cacheKey = getCacheKey(viewName, locale);
            View view = this.viewAccessCache.get(cacheKey);
            if (view == null) {
                synchronized (this.viewCreationCache) {
                    view = this.viewCreationCache.get(cacheKey);
                    if (view == null) {
                        // Ask the subclass to create the View object.
                        view = createView(viewName, locale);
                        if (view == null && this.cacheUnresolved) {
                            view = UNRESOLVED_VIEW;
                        }
                        if (view != null) {
                            this.viewAccessCache.put(cacheKey, view);
                            this.viewCreationCache.put(cacheKey, view);
                            if (logger.isTraceEnabled()) {
                                logger.trace("Cached view [" + cacheKey + "]");
                            }
                        }
                    }
                }
            }
            return (view != UNRESOLVED_VIEW ? view : null);
        }
    }
由于配置时候cache=true所以打开了cache,这里有两级缓存,定义如下:
/** 快速从Cache中获取view, 不加全局锁 */
    private final Map<Object, View> viewAccessCache = new ConcurrentHashMap<Object, View>(DEFAULT_CACHE_LIMIT);

    /** 创建view时候加全局锁 */
    @SuppressWarnings("serial")
    private final Map<Object, View> viewCreationCache =
            new LinkedHashMap<Object, View>(DEFAULT_CACHE_LIMIT, 0.75f, true) {
                @Override
                protected boolean removeEldestEntry(Map.Entry<Object, View> eldest) {
                    if (size() > getCacheLimit()) {
                        viewAccessCache.remove(eldest.getKey());
                        return true;
                    }
                    else {
                        return false;
                    }
                }
            };
为了性能,对已经创建的view直接从viewAccessCache中就可以快速获取,这避免了在创建view期间其他线程等待的现象,只有两个线程都要创建view时候才会等待。也就说当一个线程进入同步块创建view时候,其他线程获取已经存在的view不需要等待。
获取velocityview后,会委托给velocityengine获取模板,然后调用velocityview的render方法调用template.merge实际对AST进行渲染
五、参考
1.http://velocity.apache.org/
2.http://velocity.apache.org/engine/1.7/user-guide.html
原创文章,转载请注明: 转载自并发编程网 – ifeve.com本文链接地址: Velocity原理探究


暂无评论