Java并发编程【1.2时代】
本文介绍了Java原生的多线程技术(1.2),通过详细介绍wait和notify相关的机制、基础的多线程技术以及基于这些技术的等待超时、线程间的通信技术和线程池高阶技术,最后通过一个基于线程池的简单文本web服务器—MollyServer,来阐明多线程带来好处。通过介绍这些技术,展示了在没有使用Java并发包的时代(1.5-)是如何完成Java的多线程编程,为理解Java5提供了良好帮助。
线程简介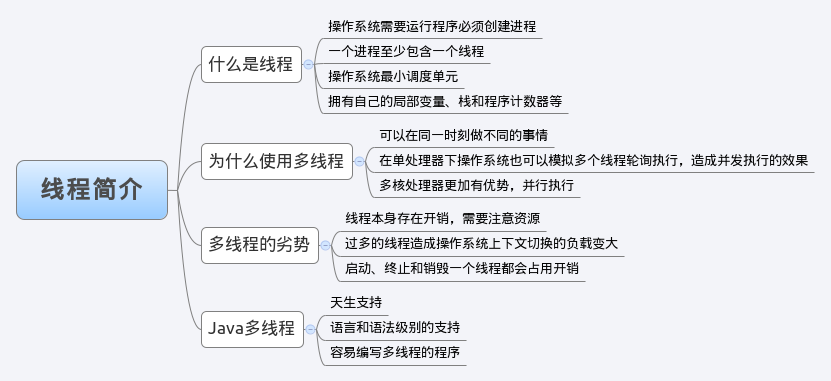
Java从诞生开始就明智的选择内置对多线程的支持,这将Java语言同其他同一时期的语言相比,具有明显优势。线程作为操作系统最小的调度单元,多个线程同时执行,将会改善我们的代码,在多核环境中具有更加明显的好处,但是过多的创建线程和对线程的不当管理也容易造成问题。
启动线程
构造线程
Java中启动线程必须要先行的构造一个Thread对象,然后调用这个对象的start方法。
[code lang=”java”]
this.group = g;
this.daemon = parent.isDaemon();
this.priority = parent.getPriority();
this.name = name.toCharArray();
if (security == null || isCCLOverridden(parent.getClass()))
this.contextClassLoader = parent.getContextClassLoader();
else
this.contextClassLoader = parent.contextClassLoader;
this.inheritedAccessControlContext = AccessController.getContext();
this.target = target;
setPriority(priority);
if (parent.inheritableThreadLocals != null)
this.inheritableThreadLocals =
ThreadLocal.createInheritedMap(parent.inheritableThreadLocals);
/* Stash the specified stack size in case the VM cares */
this.stackSize = stackSize;
/* Set thread ID */
tid = nextThreadID();
[/code]
线程的构造,最主要或者说也就是线程对象的初始化过程,在上述过程中,一个新构造的线程对象是由其parent线程来进行分配空间的,而child线程继承了parent的是否Daemon,优先级和加载资源的classloader,栈空间的大小并且还会分配一个唯一的ID来标识这个child线程,至此一个能够运行的线程对象就初始化好了,在堆内存中等待着运行。
启动线程
调用Thread对象的start方法,就可启动一个新的线程,parent线程同步告知Java VM,只要线程规划器空闲,应立即启动这个线程。

而启动线程,也是交给操作系统来完成,这里就是一个本地方法了。
启动一个线程时,最好设置名称,这样在jstack分析时,就会好很多,自定义的线程最好能够起个名字。
[code lang=”java”]
/**
* @author weipeng
*
*/
public class ThreadName {
/**
* @param args
*/
public static void main(String[] args) {
Thread t = new Thread(new Job());
t.setName("ThreadNameJob");
t.start();
}
static class Job implements Runnable {
@Override
public void run() {
try {
Thread.sleep(10000);
} catch (InterruptedException e) {
e.printStackTrace();
}
}
}
}
[/code]
上述代码直接运行,可以通过jstack pid来观察栈信息,结果如下:
[code]
2012-05-05 23:50:07
Full thread dump Java HotSpot(TM) 64-Bit Server VM (20.1-b02 mixed mode):
"Attach Listener" daemon prio=10 tid=0x00007f4c38001000 nid=0x30b5 waiting on condition [0x0000000000000000]
java.lang.Thread.State: RUNNABLE
"DestroyJavaVM" prio=10 tid=0x00007f4c60007800 nid=0x3086 waiting on condition [0x0000000000000000]
java.lang.Thread.State: RUNNABLE
"ThreadNameJob" prio=10 tid=0x00007f4c600a2800 nid=0x3097 waiting on condition [0x00007f4c37cfb000]
java.lang.Thread.State: TIMED_WAITING (sleeping)
at java.lang.Thread.sleep(Native Method)
at com.murdock.books.multithread.example.ThreadName$Job.run(ThreadName.java:26)
at java.lang.Thread.run(Thread.java:662)
"Low Memory Detector" daemon prio=10 tid=0x00007f4c60091800 nid=0x3095 runnable [0x0000000000000000]
java.lang.Thread.State: RUNNABLE
"C2 CompilerThread1" daemon prio=10 tid=0x00007f4c6008f000 nid=0x3094 waiting on condition [0x0000000000000000]
java.lang.Thread.State: RUNNABLE
"C2 CompilerThread0" daemon prio=10 tid=0x00007f4c6008c000 nid=0x3093 waiting on condition [0x0000000000000000]
java.lang.Thread.State: RUNNABLE
"Signal Dispatcher" daemon prio=10 tid=0x00007f4c6008a000 nid=0x3092 runnable [0x0000000000000000]
java.lang.Thread.State: RUNNABLE
"Finalizer" daemon prio=10 tid=0x00007f4c6006e000 nid=0x3091 in Object.wait() [0x00007f4c5c860000]
java.lang.Thread.State: WAITING (on object monitor)
at java.lang.Object.wait(Native Method)
– waiting on <0x00000000ec6b1300> (a java.lang.ref.ReferenceQueue$Lock)
at java.lang.ref.ReferenceQueue.remove(ReferenceQueue.java:118)
– locked <0x00000000ec6b1300> (a java.lang.ref.ReferenceQueue$Lock)
at java.lang.ref.ReferenceQueue.remove(ReferenceQueue.java:134)
at java.lang.ref.Finalizer$FinalizerThread.run(Finalizer.java:159)
"Reference Handler" daemon prio=10 tid=0x00007f4c6006c000 nid=0x3090 in Object.wait() [0x00007f4c5c961000]
java.lang.Thread.State: WAITING (on object monitor)
at java.lang.Object.wait(Native Method)
– waiting on <0x00000000ec6b11d8> (a java.lang.ref.Reference$Lock)
at java.lang.Object.wait(Object.java:485)
at java.lang.ref.Reference$ReferenceHandler.run(Reference.java:116)
– locked <0x00000000ec6b11d8> (a java.lang.ref.Reference$Lock)
"VM Thread" prio=10 tid=0x00007f4c60065800 nid=0x308f runnable
"GC task thread#0 (ParallelGC)" prio=10 tid=0x00007f4c6001a800 nid=0x3087 runnable
"GC task thread#1 (ParallelGC)" prio=10 tid=0x00007f4c6001c800 nid=0x3088 runnable
"GC task thread#2 (ParallelGC)" prio=10 tid=0x00007f4c6001e800 nid=0x3089 runnable
"GC task thread#3 (ParallelGC)" prio=10 tid=0x00007f4c60020000 nid=0x308a runnable
"VM Periodic Task Thread" prio=10 tid=0x00007f4c6009c000 nid=0x3096 waiting on condition
JNI global references: 882
[/code]
可以看到一个Java程序在运行时,后台创建了很多的线程,所以一个Java程序,纵使只有main,它也是多线程的,其中可以看到ThreadNameJob这个线程,也可以看到本地以吞吐量优先的ParallelGC的线程,它的数量默认是和CPU相同的,其中有4个对新生代进行GC的线程。
终止线程

线程从执行Runnalbe开始到结束。
理解中断
中断是一种状态,它使一个运行中的线程能够感知到其他线程对自身作出了中断操作,也就是影响到了自己。线程工作检查自身是否被中断来作出响应的行为。而该状态并没有维护在Thread中,是通过native方法获得。
可以通过当前线程对象的isInterrupted来判断是否被中断了。
[code lang=”java”]
/**
* @author weipeng
*
*/
public class Interrupted {
/**
* @param args
*/
public static void main(String[] args) throws Exception {
InterruptedJob ij = new InterruptedJob();
ij.setName("InterruptedJobThread ");
ij.start();
Thread.sleep(2000);
// 中断
ij.interrupt();
System.out.println("INTERRUPTED IJ");
Thread.sleep(2000);
}
static class InterruptedJob extends Thread {
@Override
public void run() {
try {
while (true) {
Thread.sleep(1000);
}
} catch (InterruptedException e) {
System.out.println("CURRENT INTERRUPT STATUS IS "
+ Thread.currentThread().getName()
+ Thread.currentThread().isInterrupted());
// 再次进行中断
Thread.currentThread().interrupt();
System.out.println("CURRENT INTERRUPT STATUS IS "
+ Thread.currentThread().getName()
+ Thread.currentThread().isInterrupted());
}
}
}
}
[/code]
上述程序输出:
INTERRUPTED IJ
CURRENT INTERRUPT STATUS IS InterruptedJobThread false
CURRENT INTERRUPT STATUS IS InterruptedJobThread true
可以看出一旦抛出InterruptedException,当前线程的中断状态就被清除,但是也可以调用Thread.interrupted()来清除当前的中断状态。
线程属性
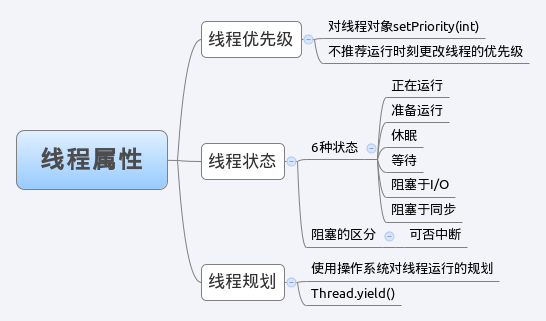
Java中创建的线程均会映射为操作系统层面的线程,在Java线程对象中有部分属性可以提供访问。线程状态是理解线程运行的关键。
线程优先级
[code lang=”java”]
public
class Thread implements Runnable {
/* Make sure registerNatives is the first thing <clinit> does. */
private static native void registerNatives();
static {
registerNatives();
}
private char name[];
private int priority;
[/code]
可以看到priority,这个代表着优先级,优先级的范围从1到10,优先级高的线程占有CPU时间长一些,这当然是在长时间运行时体现出来的,但是不能做为程序执行的依据。
对priority可以通过对线程对象进行设置,使用setPriority来完成对线程优先级的设定。
下面的例子中,构建了三个不同的线程,它们的优先级不一样,从1到10,然后运行,优先级高的线程对times++执行的会多一些。
[code lang=”java”]
/**
* @author weipeng
*
*/
public class Priority {
private static CountDownLatch countDownLatch = new CountDownLatch(10000000);
private static CountDownLatch start = new CountDownLatch(1);
public static void main(String[] args) {
CountJob job1 = new CountJob();
Thread lingdao = new Thread(job1);
lingdao.setPriority(10);
lingdao.start();
CountJob job2 = new CountJob();
Thread pming = new Thread(job2);
pming.setPriority(1);
pming.start();
CountJob job3 = new CountJob();
Thread zhongchan = new Thread(job3);
zhongchan.setPriority(5);
zhongchan.start();
start.countDown();
try {
countDownLatch.await();
} catch (InterruptedException e) {
e.printStackTrace();
}
System.out.println("lingdao : have " + job1.getTimes());
System.out.println("pming : have" + job2.getTimes());
System.out.println("zhongchan : have" + job3.getTimes());
}
static class CountJob implements Runnable {
private int times = 0;
@Override
public void run() {
// 等待开始
try {
start.await();
} catch (InterruptedException e) {
e.printStackTrace();
}
while (countDownLatch.getCount() > 0) {
synchronized (CountJob.class) {
if (countDownLatch.getCount() > 0) {
countDownLatch.countDown();
times++;
}
}
}
}
public int getTimes() {
return times;
}
}
}
[/code]
执行结果如下:
lingdao : have 4347635
pming : have2661562
zhongchan : have2990803
每次执行的可能都不一样,但是总的趋势是高优先级的线程对CPU的占用时间会多一些。
线程状态
线程在运行的生命周期中可能处于下面的6种不同的状态,在一个时刻,线程可能处于CPU上处于运行,或者暂时的没有分配到CPU资源而处于就绪(准备运行),或者处于阻塞的状态。具体内容如下面的表格所示:
|
状态名称 |
阻塞 |
可以中断 |
说明 |
| 运行中 | N | N |
正在CPU上进行执行 |
| 准备运行(就绪) | N | N | 暂时的失去CPU资源处于就绪队列中,可能随时被线程调度器调度执行 |
| 休眠 | Y | Y | 让出CPU资源的就绪队列,等待一段时间后再次被放入队列,可以被中断提前进入就绪队列 |
| 等待 | Y | Y | 接受到通知或者等待超时会进入到就绪队列,可以被中断 |
| 阻塞于I/O | Y | N | I/O条件满足后,例如读入了一些字符,准备运行 |
| 阻塞于同步 | Y | N |
当获得同步锁后准备运行 |
可以使用如下状态迁移来描述线程的状态:
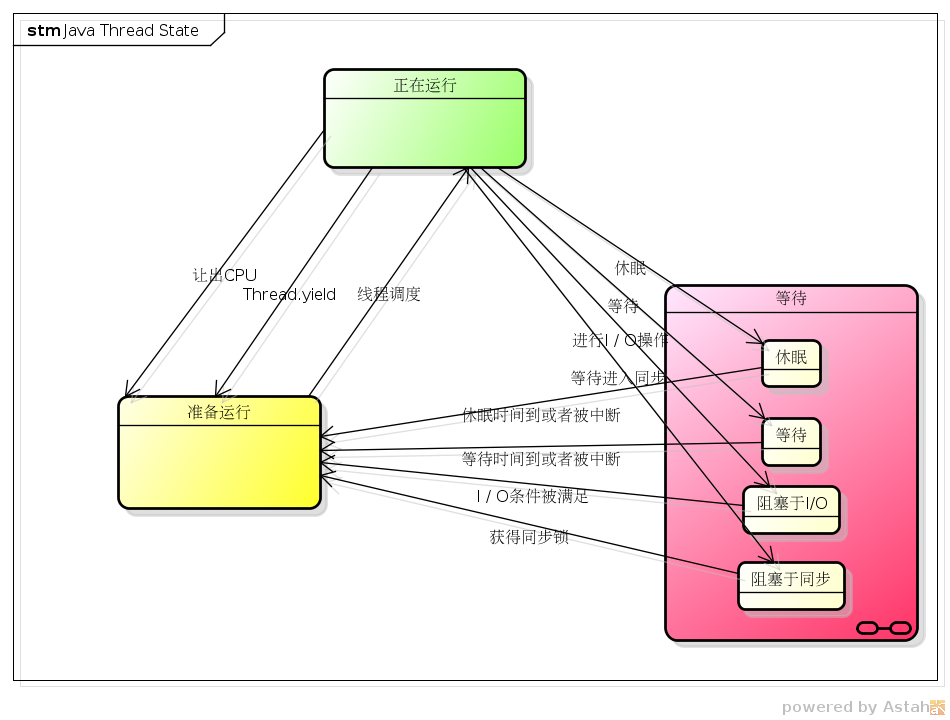
线程在一个时刻将会处于上述的三种状态之一,这个模型将有效的理解Java线程对象,但是其中处于等待状态的线程可能会在等待I/O和等待同步时无法被中断,虽然运行的线程已经被中断标识,但是不会像休眠和等待一样通过InterruptedException来直接返回。
[code lang=”java”]
/**
* <pre>
* 处于同步读取的线程被中断,不会抛出异常
*
* </pre>
*
* @author weipeng
*
*/
public class ReadInterrupted {
/**
* @param args
*/
public static void main(String[] args) {
// 使用父线程,也就是main-thread
Thread thread = new Thread(new InterruptedJob(Thread.currentThread()));
thread.start();
InputStream is = System.in;
try {
is.read();
} catch (IOException e) {
e.printStackTrace();
}
System.out.println("Main Thread is interrupted ? " + Thread.currentThread().isInterrupted());
}
static class InterruptedJob implements Runnable {
Thread interruptedThread;
public InterruptedJob(Thread thread) {
this.interruptedThread = thread;
}
@Override
public void run() {
try {
Thread.sleep(2000);
} catch (InterruptedException e) {
e.printStackTrace();
}
interruptedThread.interrupt();
}
}
}
[/code]
运行的结果是:
这时整个线程挂在is.read上,这时随意从控制台输入一个字符,主线程退出:
123
Main Thread is interrupted ? true
可以看出对阻塞于同步I/O的线程被中断后,中断标识被打上,但是不会抛出异常退出。
线程规划
对高I/O的线程尽量给予高优先级的设定,对于低I/O以CPU运算为主的线程尽量降低优先级,避免过多的占用CPU。因此,不能依据线程优先级的高低来运行程序,需要保证每个线程都有运行的机会。
并发访问对象
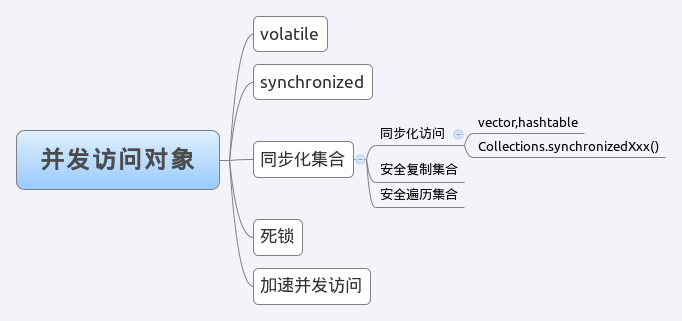
Java支持多个线程同时的访问一个对象,或者对象的变量,由于每个线程可以拥有这个变量的拷贝(这么做的目的是能够快速的执行,虽然变量分配的内存在共享内存中,但是每个执行的线程还是可以拥有一份拷贝,这样做的目的是加速程序的执行,这是现代多核处理器的一个显著特性)。因此,程序在执行过程中,可能一个线程看到的变量并不一定是最新的。
Volatile
Volatile关键字,就是告知任何对该变量的访问均需要从共享内存中获取,而对它的改变必须同步刷新会共享内存。
比如,表示一个程序是否运行的变量,boolean on = true,那么可能是另一个线程来对它进行关闭动作,因此将其设置成为volatile boolean on,这样就会再其他线程对它进行改变时,能够让原有的线程立刻感知到。
但是过多的使用volatile是不必要的,相反它会降低程序执行的效率。
Synchronized
同步,在带来可见性的同时,它主要是对多个线程在同一个时刻,只能有一个处于方法或者块中。
可以通过将synchronized关键字加在方法前面或者采用同步快的方式来进行表现:
[code lang=”java”]
static synchronized void m() {
System.out.println("T");
}
public static void main(String[] args) {
m();
synchronized(Synchronized.class) {
m();
}
}
[/code]
}
Java同步是针对普通的Java对象而言的,每个Java对象均有一把“锁”,这个锁在一个线程进入时会排斥其他线程进入,是一个排他锁。通过javap来观察字节码,可以看到:
[code]
public static void main(java.lang.String[]);
Code:
Stack=2, Locals=2, Args_size=1
0: invokestatic #31; //Method m:()V
3: ldc #1; //class com/murdock/books/multithread/example/Synchronized
5: dup
6: astore_1
7: monitorenter
8: invokestatic #31; //Method m:()V
11: aload_1
12: monitorexit
13: goto 19
16: aload_1
17: monitorexit
18: athrow
19: return
[/code]
当出现命令monitorenter时代获得了该对象的锁,当运行命令monitorexit时代表释放了该对象的锁。
同步化集合
同步化访问
在Java的集合api中有非常多的同步集合,比如:Vector和Hashtable,这些集合的所有方法都是synchronized,也就是说对这些集合的访问是同步的,但是如果每个接口都有一个专属的同步集合实现是非常不现实的,因此用过使用Collections.synchronizedXxx方法,可以包装一个同步的集合对象进行使用。
比如,摘自Collections
[code lang=”java”]
public static <T> List<T> synchronizedList(List<T> list) {
return (list instanceof RandomAccess ?
new SynchronizedRandomAccessList<T>(list) :
new SynchronizedList<T>(list));
}
[/code]
该方法返回的就是一个实现了List接口的同步数据结构,这个同步的数据结构每个方法均是同步的,但是如果需要对其进行额外的操作,需要将其加入到同步块中。
[code lang=”java”]
SynchronizedCollection(Collection<E> c) {
if (c==null)
throw new NullPointerException();
this.c = c;
mutex = this;
}
[/code]
上面可以看到同步集合均是对自身进行同步。
[code lang=”java”]
public class Synchronized {
static synchronized void m() {
System.out.println("T");
}
public static void main(String[] args) throws Exception {
List<String> s = new ArrayList<String>();
s.add("1");
List<String> synchronizedList = Collections.synchronizedList(s);
Thread t = new Thread(new AccessSynchronizedCollections(
synchronizedList));
t.start();
synchronized (synchronizedList) {
Thread.sleep(5000);
System.out.println("Main-thread" + synchronizedList.size());
}
}
/**
* 这个线程将会首先休息2000ms,然后唤醒后去请求锁,并执行操作
*/
static class AccessSynchronizedCollections implements Runnable {
List<String> list;
public AccessSynchronizedCollections(List<String> list) {
this.list = list;
}
@Override
public void run() {
try {
Thread.sleep(2000);
} catch (InterruptedException e) {
e.printStackTrace();
}
System.out.println("AccessSynchronizedCollections" + list.size());
list.add("2");
}
}
}
[/code]
上述执行的结果:
Main-thread1
AccessSynchronizedCollections1
可以看到,在自定义对集合操作,比如缺少就添加,就需要将集合进行同步,然后在进行操作,否则很容易在判定过程中加入了其他线程对集合的操作。
安全复制集合
有时一个集合对象是进程内共享的,可能会发生一些变化,因此在作出一些操作的时候,希望能够拿到一份瞬时的拷贝,这个拷贝可能和执行中的这一时刻的集合有了变化,但是能够保证是稳定的。就像我们出门买了一份报纸,我们回家阅读报纸的时候,上面的新闻可能随时会发生变化,但是这并不妨碍我们去阅读它。
第一种复制的方式:
[code lang=”java”]
List<String> synchronizedList = Collections.synchronizedList(list);
long currentTime = System.currentTimeMillis();
for (int i = 0; i < 10000; i++) {
String[] array = synchronizedList.toArray(new String[0]);
}
System.out.println(System.currentTimeMillis() – currentTime);
[/code]
第二种复制的方式:
[code lang=”java”]
for (int i = 0; i < 10000; i++) {
synchronized (synchronizedList) {
int size = synchronizedList.size();
String[] array = new String[size];
synchronizedList.toArray(array);
}
}
[/code]
第一种比较简单,第二种对于new String[0]没有做过多的浪费,但是时间测算,第二种没有第一种好,因为主要比拼的是toArray的实现,在给定的数组大于等于列表时,将会使用给定的数组,否则将会通过反射构造一个数组,而这个还是很高效的。
因此对于集合的数组复制,使用第一种方式是比较适合的。
死锁
两个线程或者多个线程在请求其永远无法获取资源的锁时,就是死锁状态。这里不演示死锁产生的范例。
避免死锁的主要原则:
首先,对于资源的加锁时间必须足够短,也就是必要时进行锁;
其次,访问资源过程中的锁需要按照一致的顺序进行获取,否则需要提升出一个更大的锁来确保资源的获取;
最后,尽量通过封装的形式,避免将锁暴露给外部,从而造成不必要的资源死锁。
线程间通信
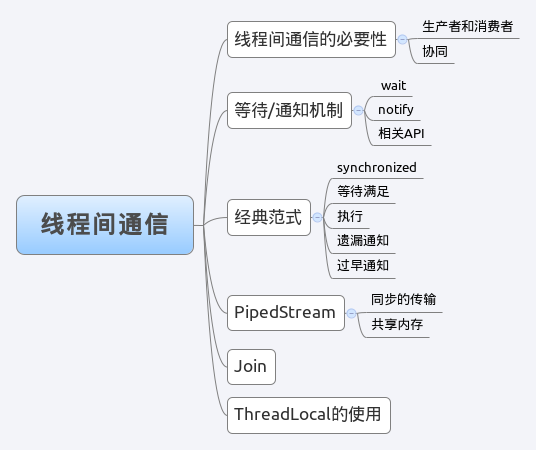
线程开始运行,就如同一个脚本一样,有自己的栈空间,按照既定的代码一步一步的执行,直到最后的终结。但是每个运作中的线程,如果仅仅是孤立的运作,那么没有一点用处,或者说用处很少,但是多个运作的线程能够相互配合,各司其职将会带来巨大的好处。
线程间通信的必要性
一个运作的脚本(线程)修改了一个对象的值,另一个线程捕获到这个对象的变化,然后进行对应的操作,这个过程事件的触发启于一个线程,而最终的执行又是一个线程。因此前者好比生产者,后者就是消费者,这样的模式隔开了生产和消费,在功能上和架构上具有良好的伸缩性。但是在Java语言中怎样能够做到上述的过程呢?
当然,简单的办法是不断的循环去查看,比如:
while (value != desire) {
Thread.sleep(1000);
}
doXxx
这段伪码就是相当与如果值不是这个消费线程所要的,那么就睡眠一段时间,这样的方式看似能够解决这个问题,但是有两个矛盾的问题。
第一个,在睡眠时,基本不消耗CPU,但是如果睡得久,那么就不能及时的发现value已经变化,也就是及时性难以保证;
第二个,如果降低睡眠的时间,比如睡1毫秒,这样消费者能更加迅速的捕获出变化,但是它却占用了更多的CPU时间,造成了无端的浪费。
面对这个矛盾,Java通过固有的wait/notify机制能够很好的实现这个模式。
等待/通知机制
等待通知机制,是指一个线程调用了对象A上的wait方法,而另外的一个线程在进行了某些操作后,在对象A上的notify或者notifyAll方法,这样完成了两个线程之间的交互。而这个wait和notify之间的关系就像一个信号量一样来完成二者之间的交互工作。
一个标准的wait和notify的例子,这个例子有两个线程,第一个等待共享的一个值为false,当为false时它进行print,另外一个在睡眠了一段时间后,将这个值由原有的true改为false并notify。
[code lang=”java”]
/**
* @author weipeng
*/
public class WaitNotify {
static boolean flag = true;
static Object OBJ = new Object();
public static void main(String[] args) {
Thread t1 = new Thread(new Waiter());
t1.start();
try {
Thread.sleep(1000);
} catch (InterruptedException e) {
e.printStackTrace();
}
Thread t2 = new Thread(new Notifier());
t2.start();
}
/**
* 等待,如果flag为false则打印
*/
static class Waiter implements Runnable {
@Override
public void run() {
// 加锁,拥有OBJ的Monitor
synchronized (OBJ) {
// 当条件不满足时,继续wait,同时释放了OBJ的锁
while (flag) {
try {
System.out.println(Thread.currentThread()
+ " still true. wait……");
OBJ.wait();
} catch (InterruptedException e) {
e.printStackTrace();
}
}
// 条件满足时,完成工作
System.out
.println(Thread.currentThread() + " is false. doXXX.");
}
}
}
static class Notifier implements Runnable {
@Override
public void run() {
synchronized (OBJ) {
// 获取OBJ的锁,然后进行通知,通知时不会释放OBJ的锁
// 这也类似于过早通知
OBJ.notifyAll();
try {
Thread.sleep(100);
} catch (InterruptedException e) {
e.printStackTrace();
}
flag = false;
OBJ.notifyAll();
}
}
}
}
[/code]
从上面的例子中能够提炼出经典的等待和通知机制,对于等待的一方,遵循如下的原则:
(1)获得对象的锁;
(2)如果条件不满足,那么调用对象的wait,释放锁,被通知后继续检查(2)
(3)条件已经满足,执行对应的逻辑。
synchronized(OBJ) {
while(Condition not hold) {
OBJ.wait();
}
// Condition hold
do XXX;
}
通知的一方,遵循如下原则:
(1)获得对象的锁;
(2)更新变量或者条件,然后通知。
synchronized(OBJ) {
value = newvalue;
OBJ.notifyAll();
}
等待/通知的API
等待和通知机制被深深植入了Java语言中,在Object方法中有5个final的方法,也就是子类不能复写的方法。
|
方法名称 |
简介 |
| notify() | 随机通知调用notify对象上正在等待的线程,注意这个通知没有放弃对对象的锁,仅在通知notify完成之后直到释放了对象的锁才在对方线程的wait方法处返回; |
| notifyAll() | 这个方法会依次通知所有的正在等待在该对象上的线程,是一种比较保险的做法; |
| wait() | 该方法会让调用线程进入休眠状态,只有等待另外线程的notify或者被中断才会返回,注意的是,调用wait后,会释放对象的锁; |
| wait(long) | 等待,这里的参数时间是毫秒,也就是等待长达n毫秒,如果没有通知就超时返回,但是这里很难区分出是其他线程的notify还是超时返回; |
| wait(long, int) | 对于超时更细粒度的控制,达到纳秒,但是这个方法用的不多。 |
这里要说明notify方法不会释放对象的锁,而也只有释放了对象的锁,另一个线程才能从wait中竞争获得对象的锁并从wait方法中返回。
[code lang=”java”]
/**
* @author weipeng
*/
public class WaitNotify {
static boolean flag = true;
static Object OBJ = new Object();
public static void main(String[] args) {
Thread t1 = new Thread(new Waiter());
t1.start();
try {
Thread.sleep(1000);
} catch (InterruptedException e) {
e.printStackTrace();
}
Thread t2 = new Thread(new Notifier());
t2.start();
}
/**
* 等待,如果flag为false则打印
*/
static class Waiter implements Runnable {
@Override
public void run() {
// 加锁,拥有OBJ的Monitor
synchronized (OBJ) {
// 当条件不满足时,继续wait,同时释放了OBJ的锁
while (flag) {
try {
System.out.println(Thread.currentThread()
+ " still true. wait……" + new Date());
OBJ.wait();
} catch (InterruptedException e) {
e.printStackTrace();
}
}
// 条件满足时,完成工作
System.out
.println(Thread.currentThread() + " is false. doXXX." + new Date());
}
}
}
static class Notifier implements Runnable {
@Override
public void run() {
synchronized (OBJ) {
// 获取OBJ的锁,然后进行通知,不会在notify调用中,释放OBJ的锁
// 这也类似于过早通知
// 直到当前线程释放了OBJ后,Waiter才能从wait方法中返回
OBJ.notifyAll();
flag = false;
try {
Thread.sleep(10000);
} catch (InterruptedException e) {
e.printStackTrace();
}
}
}
}
}
[/code]
程序的输出:
Thread[Thread-0,5,main] still true. wait……Sun Jun 24 20:53:03 CST 2012
Thread[Thread-0,5,main] is false. doXXX.Sun Jun 24 20:53:14 CST 2012
可以看到,二者之间相差了10秒,也就是Thread.sleep(10000)这段代码造成的,可以看出Notifier没有释放OBJ的锁,而Waiter在对方没有释放前是不会返回的。
PipedStream管道
Piped这个词就是管道,相当于从一端入一端出的输入输出流。只是不是从网络和文件上读入内容,而是在线程之间传递数据,而传输的媒介为内存。
管道主要包括了:
PipedOutputStream、PipedInputStream、PipedReader和PipedWriter四个,面向的处理内容为字节和字符。
[code lang=”java”]
public class PipedTest {
static class Print implements Runnable {
private PipedInputStream in;
public Print(PipedInputStream in) {
this.in = in;
}
@Override
public void run() {
int receive = 0;
try {
while ((receive = in.read()) != -1) {
System.out.println(receive);
}
} catch (IOException ex) {
ex.printStackTrace();
}
}
}
/**
* @param args
*/
public static void main(String[] args) throws Exception {
PipedOutputStream out = new PipedOutputStream();
PipedInputStream in = new PipedInputStream();
// Out ==> In
out.connect(in);
Thread t = new Thread(new Print(in));
t.start();
int receive = 0;
while ((receive = System.in.read()) != -1) {
out.write(receive);
}
}
}
[/code]
上述程序,以main线程作为输入,而另外的Print作为输出。对于Piped类型的流,必须要进行connect,如果没有绑定,对于该流的访问会抛出异常。
ThreadLocal
ThreadLocal线程变量,这是一个以ThreadLocal对象为Key,一个Object为value的存储结构。它被附带在线程上,也就是说一个线程可以根据一个ThreadLocal拥有一个变量。
在线程对象中,有一个成员变量,类型如下:
[code lang=”java”]
static class ThreadLocalMap {
/**
* The entries in this hash map extend WeakReference, using
* its main ref field as the key (which is always a
* ThreadLocal object). Note that null keys (i.e. entry.get()
* == null) mean that the key is no longer referenced, so the
* entry can be expunged from table. Such entries are referred to
* as "stale entries" in the code that follows.
*/
static class Entry extends WeakReference<ThreadLocal> {
/** The value associated with this ThreadLocal. */
Object value;
Entry(ThreadLocal k, Object v) {
super(k);
value = v;
}
}
[/code]
可以看到线程对象中的这个ThreadLocalMap是以ThreadLocal作为Key的。那么对于一个ThreadLocal在线程对其调用get方法时,会获取对应的Object,下面是get方法。
[code lang=”java”]
public T get() {
Thread t = Thread.currentThread();
ThreadLocalMap map = getMap(t);
if (map != null) {
ThreadLocalMap.Entry e = map.getEntry(this);
if (e != null)
return (T)e.value;
}
return setInitialValue();
}
[/code]
下面对这些代码做些说明:
首先调用方会获得掉用线程Thread t = Thread.currentThread();
其次会获得线程对象的ThreadLocalMap对象;
然后在ThreadLocalMap对象上,以this,也就是ThreadLocal为key去获得对应的值;
如果ThreadLocalMap这个对象为NULL,这里做延迟加载,通过setInitialValue()方法来初始化线程对象的ThreadLocalMap变量。
可以看出只有线程执行了任意ThreadLocal的get方法后,才会拥有ThreadLocalMap这个对象,而该变量又是包访问级别的,所以不会担心被其他类修改。
完全等待超时
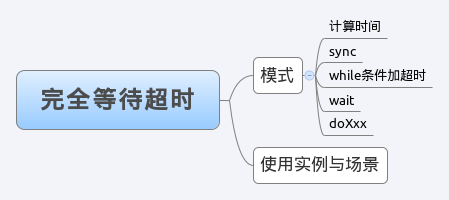
有时我们需要在调用一个方法时等待一段时间(一般来说是设置一个值,有更改),等待条件的满足,而等待是有时限的,比如:1000ms,如果在1000ms后无法满足条件那么返回,否则在时限内如果成功则立刻返回。
模式
之前提到了基于wait的经典模式,即:同步,while,wait加doXxx的逻辑,那么这种模式无法做到一点,就是能够让客户端超时返回。
如果加入超时的话,对于经典模式的修改其实不会很复杂,假设超时时间是t ms,那么可以推知在now + t之后就会超时,则定义:
remaining = t;
future = now + t;
这时仅需要wait(remaining)即可,在醒来之后会将future – now,这个会设置到remaining上,但是如果remaining为负数,则直接退出。
[code lang=”java”]
public synchronized Object get(long mills) throws InterruptedException {
long future = System.currentTimeMillis() + mills;
long remained = mills;
// 当结果为空并没有超时
while ((result == null) && remained > 0) {
wait(remained);
remained = future – System.currentTimeMillis();
}
return result;
}
[/code]
在while的判断中加入了remained > 0的约束。这个模式就可以实现等待超时,在mills毫秒内无法获取到result或者result已经获取到了,都会返回。
使用实例与场景
这里我们模拟一个数据库链接获取的过程,这是一个消费者和生产者的案例。
生产者每1000ms生产一个链接到池子中,每个消费者从池子中获取一个链接,如果在800ms获取不到,那么就返回,并告知获取链接超时。初始的池子里有10个链接,消费者有5个,生产者有2个。
Connection的定义
[code lang=”java”]
public class Connection {
public void sendStatement() {
try {
Thread.sleep(10);
System.out.println(Thread.currentThread() + " Send Statement");
} catch (InterruptedException e) {
Thread.currentThread().interrupt();
}
}
}
[/code]
ConnectionPool的定义
[code lang=”java”]
public class ConnectionPool {
private LinkedList<Connection> pool = new LinkedList<Connection>();
private static final int MAX_SIZE = 20;
public ConnectionPool(int initialSize){
if (initialSize > 0) {
for (int i = 0; i < initialSize; i++) {
pool.addLast(new Connection());
}
}
}
public void releaseConnection() throws InterruptedException {
synchronized (pool) {
while (pool.size() >= MAX_SIZE) {
pool.wait();
}
// 添加后需要进行通知,这样其他消费者能够感知到链接池中已经增加了一个链接
pool.addLast(new Connection());
pool.notifyAll();
}
}
public Connection fetchConnection(long mills) throws InterruptedException {
synchronized (pool) {
// 完全超时
if (mills <= 0) {
while (pool.isEmpty()) {
pool.wait();
}
return pool.removeFirst();
} else {
long futureTime = System.currentTimeMillis() + mills;
long deltaTime = mills;
while (pool.isEmpty() && deltaTime > 0) {
pool.wait(deltaTime);
deltaTime = futureTime – System.currentTimeMillis();
}
Connection result = null;
if (!pool.isEmpty()) {
result = pool.removeFirst();
}
return result;
}
}
}
}
[/code]
这里主要看一下fecthConnection,它提供了完全超时的实现,主要是通过计算出将要超时的时间点futureTime,和超时的时间距离deltaTime,在这个基础上复用了仅点的同步、while和do的结构,只不过是在while的不通过条件中增加了时间距离的消耗判断,如果小于0直接返回,当然面对过早通知,将会更新deltaTime。
当执行从pool.wait方法中返回后,有可能是超时,也有可能是已经满足了池中有连接的状况,因此如果有连接则直接返回,否则返回空。
测试用例
[code lang=”java”]
public class ConnectionPoolTest {
static ConnectionPool pool = new ConnectionPool(10);
static CountDownLatch latch = new CountDownLatch(1);
/**
* <pre>
* Thread[Thread-5,5,main] put a connection.
* Thread[Thread-6,5,main] put a connection.
* Thread[Thread-4,5,main] got a connection
* Thread[Thread-3,5,main] got a connection
* Thread[Thread-5,5,main] put a connection.
* Thread[Thread-6,5,main] put a connection.
* Thread[Thread-1,5,main] got a connection
* Thread[Thread-4,5,main] got a connection
* </pre>
*
* @param args
*/
public static void main(String[] args) {
for (int i = 0; i < 5; i++) {
Consumer p = new Consumer(latch);
Thread t = new Thread(p);
t.start();
}
for (int i = 0; i < 2; i++) {
Producer p = new Producer(latch);
Thread t = new Thread(p);
t.start();
}
latch.countDown();
}
static class Producer implements Runnable {
private CountDownLatch latch;
public Producer(CountDownLatch latch){
this.latch = latch;
}
public void run() {
try {
latch.await();
} catch (InterruptedException e) {
Thread.currentThread().interrupt();
}
while (true) {
try {
Thread.sleep(1000);
} catch (InterruptedException e) {
e.printStackTrace();
}
try {
pool.releaseConnection();
} catch (InterruptedException e) {
e.printStackTrace();
}
System.out.println(Thread.currentThread() + " put a connection.");
}
}
}
static class Consumer implements Runnable {
private CountDownLatch latch;
public Consumer(CountDownLatch latch){
this.latch = latch;
}
public void run() {
try {
latch.await();
} catch (InterruptedException e) {
Thread.currentThread().interrupt();
}
while (true) {
try {
Thread.sleep(1000);
} catch (InterruptedException e) {
e.printStackTrace();
}
try {
Connection connection = pool.fetchConnection(0);
if (connection == null) {
System.out.println(Thread.currentThread() + " can not got a connection");
} else {
System.out.println(Thread.currentThread() + " got a connection");
}
} catch (InterruptedException e) {
e.printStackTrace();
}
}
}
}
}
[/code]
这是一个执行了一段时间的结果:
[code]
Thread[Thread-5,5,main] put a connection.
Thread[Thread-0,5,main] got a connection
Thread[Thread-6,5,main] put a connection.
Thread[Thread-0,5,main] got a connection
Thread[Thread-6,5,main] put a connection.
Thread[Thread-5,5,main] put a connection.
Thread[Thread-4,5,main] got a connection
Thread[Thread-5,5,main] put a connection.
Thread[Thread-6,5,main] put a connection.
Thread[Thread-4,5,main] got a connection
Thread[Thread-0,5,main] got a connection
[/code]
可以看到,因为生产者少,所以每次生产连接后,都被等待的消费者取走,而超时是完全超时,如果我们吧等待的时间长度调整到2000ms,就可以看到如下结果:
[code]
Thread[Thread-6,5,main] put a connection.
Thread[Thread-0,5,main] got a connection
Thread[Thread-2,5,main] got a connection
Thread[Thread-1,5,main] can not got a connection
Thread[Thread-5,5,main] put a connection.
Thread[Thread-6,5,main] put a connection.
[/code]
有部分消费者,等待了2000ms没有得到连接后,就返回了,这里就非常类似数据库链接池的实现。
阻塞队列(FIFO)
阻塞队列是对于资源获取和释放的一个良好数据结构,比如:作为资源的生产方,如果生产方生产的数据没有位置存放,那么生产方将会阻塞在生产的这个方法上,当然也可以选择阻塞多少毫秒。消费方也是同样的道理。
阻塞队列
[code lang=”java”]
/**
* @author weipeng 2012-7-24 下午4:34:22
*/
public class BlockingQueue<E> {
/**
* 默认队列长度
*/
private static final int DEFAULT_SIZE = 10;
/**
* 队列数组
*/
private Object[] array;
/**
* 当前的长度
*/
private int size;
/**
* 将要放置的位置
*/
private int head;
/**
* 将要移除的位置
*/
private int tail;
public BlockingQueue(int size){
array = size > 0 ? new Object[size] : new Object[DEFAULT_SIZE];
}
public BlockingQueue(){
this(DEFAULT_SIZE);
}
public int getCapacity() {
return array.length;
}
/**
* @return
*/
public int getSize() {
synchronized (array) {
return size;
}
}
@SuppressWarnings("unchecked")
public E take(long millis) throws InterruptedException {
long waitTime = millis > 0 ? millis : 0;
synchronized (array) {
Object result = null;
if (waitTime == 0) {
while (size <= 0) {
array.wait();
}
result = array[tail];
size–;
tail = (tail + 1) % getCapacity();
} else {
long future = System.currentTimeMillis() + waitTime;
long remain = waitTime;
while (size <= 0 && remain > 0) {
array.wait(remain);
remain = future – System.currentTimeMillis();
}
if (size > 0) {
result = array[tail];
size–;
tail = (tail + 1) % getCapacity();
}
}
array.notifyAll();
return (E) result;
}
}
public E take() throws InterruptedException {
return take(0);
}
public boolean offer(E e, long mills) throws InterruptedException {
long waitTime = mills > 0 ? mills : 0;
boolean result = false;
if (e != null) {
synchronized (array) {
if (waitTime <= 0) {
while (size >= getCapacity()) {
array.wait();
}
array[head] = e;
size++;
head = (head + 1) % getCapacity();
result = true;
} else {
long future = System.currentTimeMillis() + waitTime;
long remain = waitTime;
while (size >= getCapacity() && remain > 0) {
array.wait(remain);
remain = future – System.currentTimeMillis();
}
if (size < getCapacity()) {
array[head] = e;
size++;
head = (head + 1) % getCapacity();
result = true;
}
}
array.notifyAll();
}
}
return result;
}
public boolean offer(E e) throws InterruptedException {
return offer(e, 0);
}
public void printQueue() {
synchronized (array) {
System.out.println("======================");
for (int i = 0; i < size; i++) {
System.out.println("[" + i + "]" + array[i]);
}
System.out.println("[head]" + head);
System.out.println("[tail] " + tail);
System.out.println("[size]" + size);
System.out.println("======================");
}
}
}
[/code]
其中 head是插入的位置,tail是移除的位置。下面是测试用例:
[code lang=”java”]
@Test
public void offer() throws InterruptedException {
for (int i = 0; i < 10; i++) {
queue.offer(new Object());
}
queue.printQueue();
System.out.println(queue.offer(new Object(), 1000));
}
[/code]
输出结果:
[code]
======================
[0]java.lang.Object@78ce5b1c
[1]java.lang.Object@33bfc93a
[2]java.lang.Object@74341960
[3]java.lang.Object@86e293a
[4]java.lang.Object@7854a328
[5]java.lang.Object@7ca3d4cf
[6]java.lang.Object@67e8a1f6
[7]java.lang.Object@59e152c5
[8]java.lang.Object@5801319c
[9]java.lang.Object@366025e7
[head]0
[tail] 0
[size]10
======================
false
[/code]
可以看到第11次添加被阻塞了,在1秒内没有添加成功,那么直接返回false。
[code lang=”java”]
@Test
public void take() throws InterruptedException {
Thread t = new Thread() {
Thread thread;
{
thread = Thread.currentThread();
}
@Override
public void run() {
try {
Thread.sleep(500);
} catch (InterruptedException e) {
e.printStackTrace();
}
thread.interrupt();
}
};
t.start();
System.out.println(queue.take(2000));
}
[/code]
结果是在2秒内,还没有获取到,主线程被中断,而take能够感知到中断,就提前返回了。
[code lang=”java”]
@Test
public void interactive() throws Exception {
final AtomicLong offer = new AtomicLong();
final AtomicLong take = new AtomicLong();
final AtomicLong notTake = new AtomicLong();
Thread t = new Thread() {
public void run() {
while (true) {
try {
queue.offer(new Object());
offer.incrementAndGet();
} catch (InterruptedException e) {
e.printStackTrace();
}
}
}
};
t.start();
Thread t1 = new Thread() {
public void run() {
while (true) {
try {
if (queue.take(1) == null) {
notTake.incrementAndGet();
} else {
take.incrementAndGet();
}
} catch (InterruptedException e) {
e.printStackTrace();
}
}
}
};
t1.start();
Thread t2 = new Thread() {
public void run() {
while (true) {
try {
if (queue.take(1) == null) {
notTake.incrementAndGet();
} else {
take.incrementAndGet();
}
} catch (InterruptedException e) {
e.printStackTrace();
}
}
}
};
t2.start();
Thread.sleep(10000);
t.interrupt();
t1.interrupt();
t2.interrupt();
System.out.println(offer.get());
System.out.println(take.get());
System.out.println(notTake.get());
queue.printQueue();
}
[/code]
运行了10秒钟,1个生产方,2个消费方,每个消费者在1ms内没有获取到的时候,就会将notTake加1。
结果输出:
[code lang=”java”]
java.lang.InterruptedException
at java.lang.Object.wait(Native Method)
at com.murdock.controller.BlockingQueue.take(BlockingQueue.java:74)
at com.murdock.controller.BlockingQueueTest$3.run(BlockingQueueTest.java:81)
java.lang.InterruptedException
at java.lang.Object.wait(Native Method)
at com.murdock.controller.BlockingQueue.take(BlockingQueue.java:74)
at com.murdock.controller.BlockingQueueTest$4.run(BlockingQueueTest.java:99)
java.lang.InterruptedException
at java.lang.Object.wait(Native Method)
at java.lang.Object.wait(Object.java:485)
at com.murdock.controller.BlockingQueue.offer(BlockingQueue.java:103)
at com.murdock.controller.BlockingQueue.offer(BlockingQueue.java:137)
at com.murdock.controller.BlockingQueueTest$2.run(BlockingQueueTest.java:65)
[/code]
8828338
8828338
6283
======================
[head]8
[tail] 8
[size]0
======================
可以看到有6283次没有获取到,生产了8828338次,消费了8828338次,一致的,但是有6283次没有获取到数据,因为超时返回了。
线程池(ThreadPool)
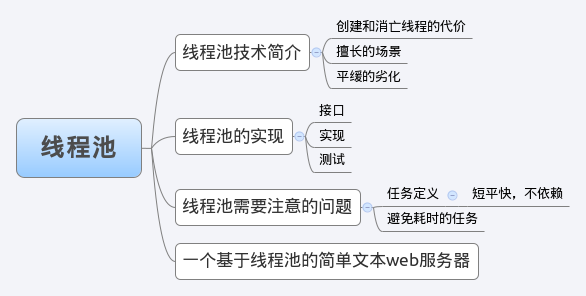
线程池技术简介
对于服务端的程序,经常处理的场景是:
面对客户端传入的短小任务,快速的处理并返回。
如果每次接受到一个任务,创建一个线程,然后进行执行,这种模式在原型阶段是个不错的选择,但是如果面对的是成千上万的任务递交进服务器时,如果还是采用一个任务一个线程的方式,那么将会创建数以万记的线程,从而是操作系统进入到频繁上下文切换的状态,而如文中第一章所述,线程的创建和消亡是需要耗费系统资源的,这样无疑是无法满足要求的。
而线程池技术能够很好的解决这个问题,它预先的创建了若干的线程,也就是说线程的创建是托管的,并不能由用户直接完全控制,从而使用固定或较为固定数目的线程来完成任务的执行,一方面消除了频繁创建和消亡线程的开销,另一方面,随着任务的请求多少能够平缓的进行响应。
在最优的状态下,系统面临大量的请求和较小的请求时,总体线程数量水平波动不大,当请求的规模变大时,响应处于平缓的劣化。
线程池的实现
线程池接口的定义
[code lang=”java”]
/**
* @author weipeng
*/
public interface ThreadPool<Job extends Runnable> {
/**
* <pre>
* 执行一个Job,这个Job需要实现Runnable
*
* </pre>
*
* @param job
*/
void execute(Job job);
/**
* <pre>
* 关闭线程池
*
* </pre>
*/
void shutdown();
/**
* <pre>
* 增加工作线程
*
* </pre>
*
* @param workerNum
*/
void addWorkers(int workerNum);
/**
* <pre>
* 减少工作线程
*
* </pre>
*
* @param workerNum
*/
void removeWorker(int workerNum);
/**
* <pre>
* 得到Jobs的列表
*
* </pre>
*
* @return
*/
int getJobSize();
}
[/code]
可以看到上面的接口可以完成一个Runnable的执行,并且能够将线程池中的工作线程进行增加和减少,同时可以支持优雅的关闭。
线程池的实现
[code lang=”java”]
/**
* <pre>
* 默认的线程池实现,可以新增工作线程也可以减少工作线程
*
* 当然提交JOB后会进入队列中,而Worker进行消费
*
* 这是一个简单的生产和消费者模式
*
* </pre>
*
* @author weipeng
*
*/
public class DefaultThreadPool<Job extends Runnable> implements ThreadPool<Job> {
/**
* 线程池最大限制数
*/
private static final int MAX_WORKER_NUMBERS = 10;
/**
* 线程池默认的数量
*/
private static final int DEFAULT_WORKER_NUMBERS = 5;
/**
* 线程池最小的数量
*/
private static final int MIN_WORKER_NUMBERS = 1;
/**
* 这是一个工作列表,将会向里面插入工作
*/
private final LinkedList<Job> jobs = new LinkedList<Job>();
/**
* 工作者列表
*/
private final List<Worker> workers = Collections
.synchronizedList(new ArrayList<Worker>());
/**
* 工作者线程的数量
*/
private int workerNum = DEFAULT_WORKER_NUMBERS;
public DefaultThreadPool() {
initializeWokers(DEFAULT_WORKER_NUMBERS);
}
public DefaultThreadPool(int num) {
workerNum = num > MAX_WORKER_NUMBERS ? MAX_WORKER_NUMBERS
: num < MIN_WORKER_NUMBERS ? MIN_WORKER_NUMBERS : num;
initializeWokers(workerNum);
}
/*
* (non-Javadoc)
*
* @see
* com.murdock.books.multithread.example.ThreadPool#execute(java.lang.Runnable
* )
*/
@Override
public void execute(Job job) {
if (job != null) {
// 添加一个工作,然后进行通知
synchronized (jobs) {
jobs.addLast(job);
jobs.notify();
}
}
}
/*
* (non-Javadoc)
*
* @see com.murdock.books.multithread.example.ThreadPool#shutdown()
*/
@Override
public void shutdown() {
for (Worker worker : workers) {
worker.shutdown();
}
}
@Override
public void addWorkers(int workerNum) {
int addedNum = workerNum;
if (workerNum + this.workerNum > MAX_WORKER_NUMBERS) {
addedNum = MAX_WORKER_NUMBERS – this.workerNum;
}
synchronized (jobs) {
initializeWokers(addedNum);
this.workerNum = this.workerNum + addedNum;
}
}
@Override
public void removeWorker(int workerNum) {
if (workerNum >= this.workerNum) {
throw new IllegalArgumentException(
"can not remove beyond workerNum. now num is "
+ this.workerNum);
}
synchronized (jobs) {
int count = 0;
while (count < workerNum) {
workers.get(count).shutdown();
count++;
}
this.workerNum = this.workerNum – count;
}
}
@Override
public int getJobSize() {
return jobs.size();
}
/**
* 初始化线程工作者
*/
private void initializeWokers(int num) {
for (int i = 0; i < num; i++) {
Worker worker = new Worker();
workers.add(worker);
Thread thread = new Thread(worker);
thread.start();
}
}
/**
* <pre>
* 工作者,负责消费任务
*
* </pre>
*/
class Worker implements Runnable {
/**
* 工作
*/
private volatile boolean running = true;
@Override
public void run() {
while (running) {
Job job = null;
synchronized (jobs) {
// 如果工作者列表是空的,那么就wait,放弃cpu执行占用
while (jobs.isEmpty()) {
try {
jobs.wait();
} catch (InterruptedException ex) {
Thread.currentThread().interrupt();
return;
}
}
// 取出一个Job
job = jobs.removeFirst();
}
if (job != null) {
try {
job.run();
} catch (Exception ex) {
ex.printStackTrace();
}
}
}
}
public void shutdown() {
running = false;
}
}
}
[/code]
上面的逻辑中,客户端调用execute时,会不断的向jobs中添加工作,而每个Worker在不断将jobs取出并执行,当jobs为空时,Worker进行阻塞状态。
这里有一点需要注意,也就是execute时,使用了notify,而不是notifyAll,因为我能够确定有消费者Worker被唤醒,这时使用notify将会比notifyAll获得更小的开销,这在高性能的并发处理中是非常重要的。
测试用例
测试提交工作
[code lang=”java”]
@Test
public void testExe() {
for (int i = 0; i < 1000; i++) {
threadPoolNoPrint.execute(new NoPrint());
}
sleep(20);
System.out.println(threadPoolNoPrint.getJobSize());
sleep(20);
System.out.println(threadPoolNoPrint.getJobSize());
sleep(20);
System.out.println(threadPoolNoPrint.getJobSize());
sleep(5000);
System.out.println(threadPoolNoPrint.getJobSize());
}
[/code]
执行结果:
991
985
980
可以看到提交后,每个20ms,查看已经堆积的任务,发现在不断的减少。
测试增加工作线程
[code lang=”java”]
@Test
public void addExe() {
for (int i = 0; i < 1000; i++) {
threadPoolNoPrint.execute(new NoPrint());
}
sleep(20);
System.out.println(threadPoolNoPrint.getJobSize());
sleep(20);
System.out.println(threadPoolNoPrint.getJobSize());
sleep(20);
System.out.println(threadPoolNoPrint.getJobSize());
System.out.println("============Add Worker============");
threadPoolNoPrint.addWorkers(5);
System.out.println(threadPoolNoPrint.getJobSize());
sleep(20);
System.out.println(threadPoolNoPrint.getJobSize());
sleep(20);
System.out.println(threadPoolNoPrint.getJobSize());
sleep(5000);
System.out.println(threadPoolNoPrint.getJobSize());
}
[/code]
执行结果:
990
985
980
============Add Worker============
980
967
955
在起初的5个线程运作时,可以看到每隔一段时间,消耗了5个工作,而增加了线程(并发度增加)后,没个间隔消耗量12个左右工作,提升了1倍多。
减少工作线程
[code lang=”java”]
@Test
public void reduceExe() {
for (int i = 0; i < 1000; i++) {
threadPoolNoPrint.execute(new NoPrint());
}
sleep(20);
System.out.println(threadPoolNoPrint.getJobSize());
sleep(20);
System.out.println(threadPoolNoPrint.getJobSize());
sleep(20);
System.out.println(threadPoolNoPrint.getJobSize());
System.out.println("============Add Worker============");
threadPoolNoPrint.addWorkers(5);
System.out.println(threadPoolNoPrint.getJobSize());
sleep(20);
System.out.println(threadPoolNoPrint.getJobSize());
sleep(20);
System.out.println(threadPoolNoPrint.getJobSize());
System.out.println("==============Reduce Worker==============");
threadPoolNoPrint.removeWorker(7);
System.out.println(threadPoolNoPrint.getJobSize());
sleep(20);
System.out.println(threadPoolNoPrint.getJobSize());
sleep(20);
System.out.println(threadPoolNoPrint.getJobSize());
sleep(5000);
System.out.println(threadPoolNoPrint.getJobSize());
}
[/code]
执行结果:
990
985
980
============Add Worker============
980
965
955
==============Reduce Worker==============
955
952
949
可以看到5个线程开始执行,然后增加到了10个,最后减少到了3个,执行的单位时间完成工作出现了先上扬再回落的过程。
关闭线程池
[code lang=”java”]
@Test
public void gracefulShutdown() {
for (int i = 0; i < 1000; i++) {
threadPoolPrint.execute(new Print());
}
sleep(50);
threadPoolPrint.shutdown();
}
[/code]
执行结果:
[code lang=”java”]
Thread[Thread-1,5,main], time=1347615521118
Thread[Thread-3,5,main], time=1347615521118
Thread[Thread-0,5,main], time=1347615521118
Thread[Thread-4,5,main], time=1347615521118
Thread[Thread-2,5,main], time=1347615521118
Thread[Thread-1,5,main], time=1347615521124
Thread[Thread-4,5,main], time=1347615521124
Thread[Thread-0,5,main], time=1347615521124
Thread[Thread-3,5,main], time=1347615521124
Thread[Thread-2,5,main], time=1347615521124
Thread[Thread-1,5,main], time=1347615521129
Thread[Thread-3,5,main], time=1347615521129
Thread[Thread-0,5,main], time=1347615521129
Thread[Thread-4,5,main], time=1347615521129
Thread[Thread-2,5,main], time=1347615521129
Thread[Thread-1,5,main], time=1347615521134
Thread[Thread-3,5,main], time=1347615521134
Thread[Thread-0,5,main], time=1347615521135
Thread[Thread-4,5,main], time=1347615521135
Thread[Thread-2,5,main], time=1347615521135
Thread[Thread-1,5,main], time=1347615521140
Thread[Thread-3,5,main], time=1347615521140
Thread[Thread-0,5,main], time=1347615521140
Thread[Thread-4,5,main], time=1347615521140
Thread[Thread-2,5,main], time=1347615521140
Thread[Thread-1,5,main], time=1347615521145
Thread[Thread-3,5,main], time=1347615521145
Thread[Thread-0,5,main], time=1347615521145
Thread[Thread-4,5,main], time=1347615521145
Thread[Thread-2,5,main], time=1347615521145
Thread[Thread-1,5,main], time=1347615521150
Thread[Thread-3,5,main], time=1347615521150
Thread[Thread-0,5,main], time=1347615521150
Thread[Thread-4,5,main], time=1347615521151
Thread[Thread-2,5,main], time=1347615521151
Thread[Thread-1,5,main], time=1347615521155
Thread[Thread-3,5,main], time=1347615521156
Thread[Thread-0,5,main], time=1347615521156
Thread[Thread-4,5,main], time=1347615521156
Thread[Thread-2,5,main], time=1347615521156
Thread[Thread-1,5,main], time=1347615521161
Thread[Thread-3,5,main], time=1347615521161
Thread[Thread-0,5,main], time=1347615521161
Thread[Thread-2,5,main], time=1347615521161
Thread[Thread-4,5,main], time=1347615521161
Thread[Thread-1,5,main], time=1347615521166
Thread[Thread-3,5,main], time=1347615521166
Thread[Thread-0,5,main], time=1347615521166
Thread[Thread-4,5,main], time=1347615521167
Thread[Thread-2,5,main], time=1347615521166
[/code]
可以看到1000个工作,在50ms后消耗了上图所示的工作,而非1000个全部,整个关闭过程没有异常发生,俗称“优雅关闭”。
一个基于线程池的简单文本web服务器
我们将一个Http请求作为一个工作,提交到线程池中,然后由线程池的工作者来完成对请求的分析以及响应的回复,这样做能够极大的提升服务的效率,这也是传统、经典的Web服务器运作方式。
[code lang=”java”]
/**
*
*/
package com.murdock.books.multithread.example;
import java.io.BufferedReader;
import java.io.FileInputStream;
import java.io.InputStreamReader;
import java.io.PrintWriter;
import java.net.ServerSocket;
import java.net.Socket;
/**
* <pre>
* 请求:
* GET /p/1845211588 HTTP/1.1
*
* 响应:
* HTTP/1.1 200 OK
* Date: Fri, 14 Sep 2012 11:39:26 GMT
* Content-Type: text/html; charset=GBK
* Transfer-Encoding: chunked
* Connection: Keep-Alive
* Vary: Accept-Encoding
* tracecode: 23665957650539960842091419, 23665874971177305354091419
* Content-Encoding: gzip
* Server: Apache
* </pre>
*
* @author weipeng
*
*/
public class HttpTextServer {
static ThreadPool<TextHandler> threadPool = new DefaultThreadPool<TextHandler>(
10);
static String basePath = "/home/weipeng/project/multithread";
public static void main(String[] args) throws Exception {
ServerSocket ss = new ServerSocket(8080);
Socket socket = null;
while ((socket = ss.accept()) != null) {
threadPool.execute(new TextHandler(socket));
}
ss.close();
}
static class TextHandler implements Runnable {
private Socket socket;
public TextHandler(Socket socket) {
this.socket = socket;
}
@Override
public void run() {
String line = null;
BufferedReader br = null;
BufferedReader reader = null;
PrintWriter out = null;
try {
reader = new BufferedReader(new InputStreamReader(
socket.getInputStream()));
String header = reader.readLine();
String filePath = basePath + header.split(" ")[1];
br = new BufferedReader(new InputStreamReader(
new FileInputStream(filePath)));
out = new PrintWriter(socket.getOutputStream());
out.println("HTTP/1.1 200 OK");
out.println("Content-Type: text/html; charset=UTF-8");
out.println("Server: SimpleMolly");
out.println("");
while ((line = br.readLine()) != null) {
out.println(line);
}
out.println("CURRENT-THREAD ===> " + Thread.currentThread());
out.flush();
} catch (Exception ex) {
ex.printStackTrace();
} finally {
if (br != null) {
try {
br.close();
} catch (Exception ex) {
ex.printStackTrace();
} finally {
br = null;
}
}
if (reader != null) {
try {
reader.close();
} catch (Exception ex) {
ex.printStackTrace();
} finally {
reader = null;
}
}
if (out != null) {
try {
out.close();
} catch (Exception ex) {
ex.printStackTrace();
} finally {
out = null;
}
}
if (socket != null) {
try {
socket.close();
} catch (Exception ex) {
ex.printStackTrace();
} finally {
socket = null;
}
}
}
}
}
}
[/code]
实现简介:
(1)服务端监听8080端口;
(2)当一个socket链接上来后,将其放置入线程池;
(3)线程池中的worker也就是TextHandler从socket中获取需要访问的资源;
(4)根据资源的路径找到资源并读取同时输出到socket的输出流;
(5)关闭输出流和相关资源。
访问效果:
第一次访问:

第二次访问:

可以看到一个线程2提供的服务,一个是线程3的,证明是多个线程交替的提供服务。
原创文章,转载请注明: 转载自并发编程网 – ifeve.com本文链接地址: Java并发编程【1.2时代】


“也可以看到本地以吞吐量优先的ParallelGC的线程,它的数量默认是和CPU相同的,其中有4个对新生代进行GC的线程。” 请问从哪里看出这4个GC线程都是对新生代进行回收的呢?
赞一个!